This workshop utilizes an Agentic AI application for booking travel.
In this section, we’ll walk through the application architecture and
highlight the key LangChain and LangGraph concepts it uses.
LangChain vs. LangGraph
LangChain provides the core building blocks for working with large language models,
such as prompts, tools, and model integrations. LangGraph builds on those concepts
to orchestrate complex, stateful workflows between those components. In simple terms,
LangChain helps you define what an LLM-powered step does, while LangGraph helps
control how those steps flow together in an agentic application.
Although the primary goal of the workshop is to instrument the application with OpenTelemetry,
having a basic understanding of how the application is structured will make the observability
work much clearer. Seeing how the agents, tools, and workflows are built will help you
recognize what the telemetry represents once we begin tracing and analyzing the system.
If you’d like to explore the implementation while we go through the architecture,
the application source code is available on your EC2 instance at:
~/workshop/agentic-ai/base-app/main.py.
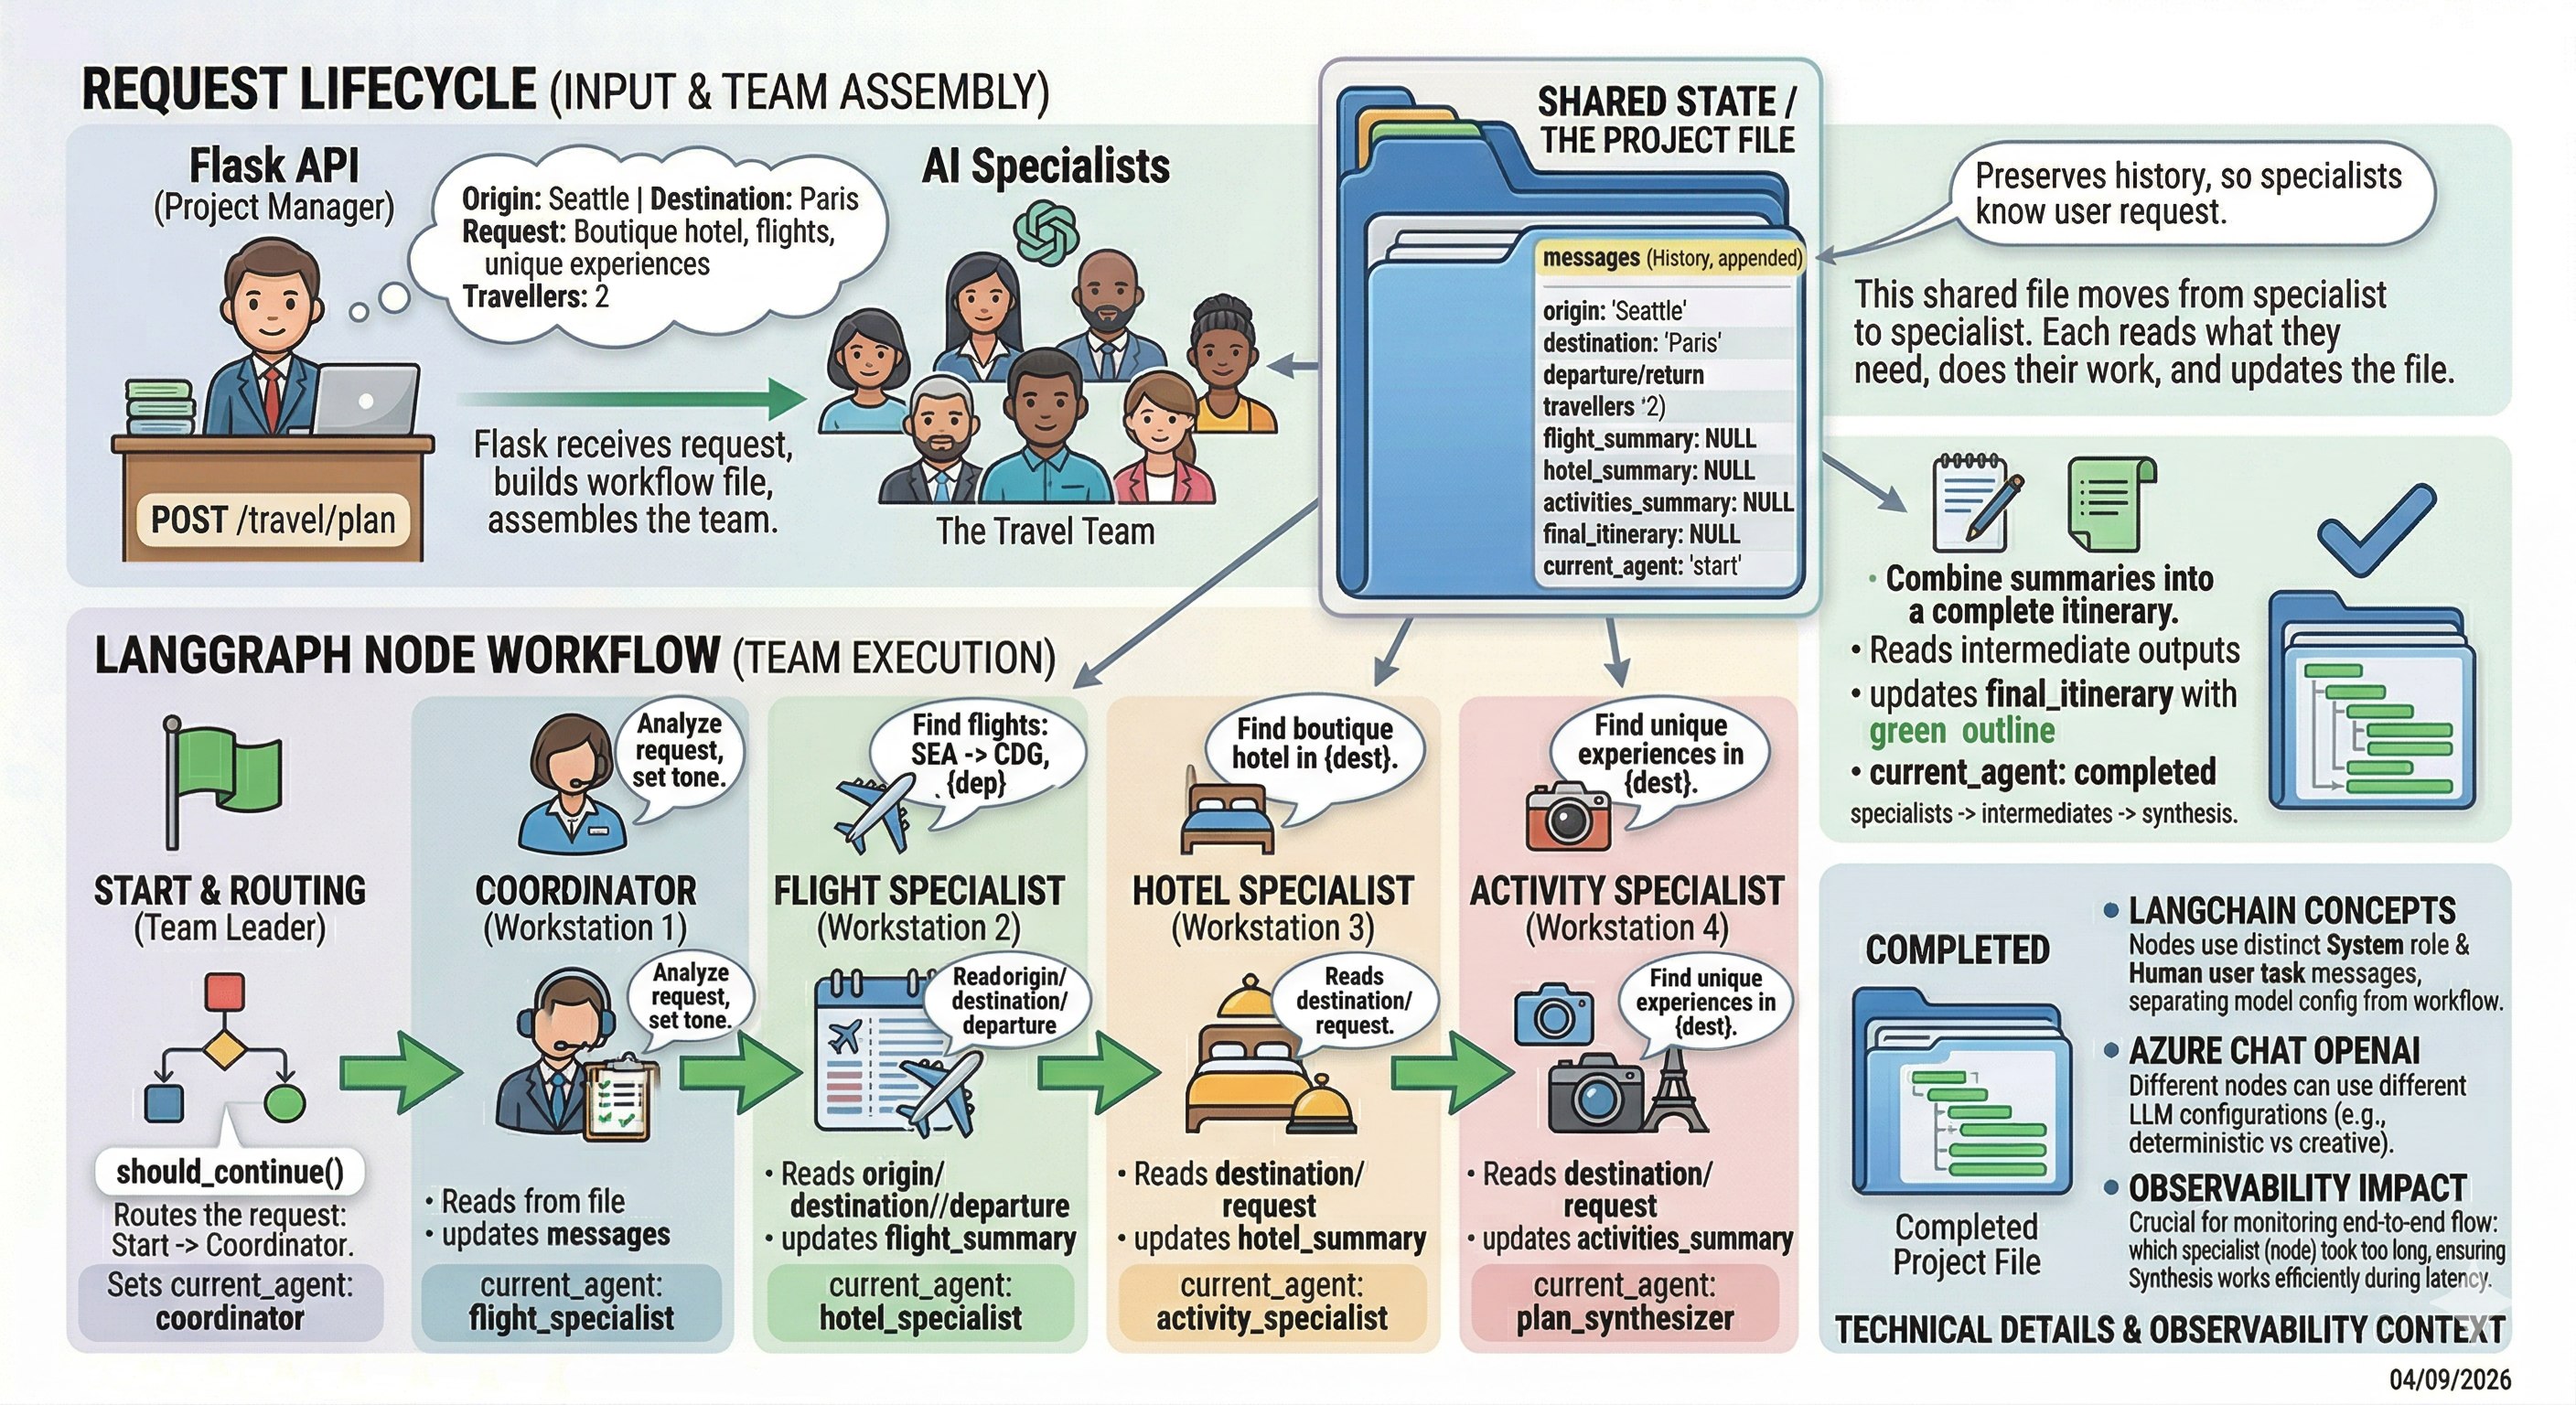
The application is a Flask API that accepts a travel planning request and runs it through
a LangGraph workflow made up of several LangChain-powered LLM nodes. Each node plays a specific
role, updates shared state, and hands off to the next step.
In this part of the workshop, we will review:
the request lifecycle
the shared state model
how LangGraph nodes work
the LangChain abstractions used in the code
where observability will matter later
Navigate to the subsections to learn more about the application architecture and implementation.
Subsections of 4. Agentic AI Application Architecture
4.1 Request Lifecycle
What the application does
At a high level, the application accepts a request and turns it into a multi-step workflow:
coordinator
flight specialist
hotel specialist
activity specialist
synthesizer
The main flow looks like this:
@app.route("/travel/plan",methods=["POST"])defplan():data=request.get_json()origin=data.get("origin","Seattle")destination=data.get("destination","Paris")user_request=data.get("user_request",f"Planning a week-long trip from {origin} to {destination}. ""Looking for boutique hotel, flights and unique experiences.",)travellers=int(data.get("travellers",2))result=plan_travel_internal(origin=origin,destination=destination,user_request=user_request,travellers=travellers)returnjsonify(result),200
A helpful way to explain this is:
Flask receives the request
plan_travel_internal() builds the workflow state
LangGraph executes the nodes
each node updates the state
the final itinerary is returned as JSON
Knowledge Check
Where does the LangGraph workflow actually start executing in this API flow?
Click here to see the answer
It starts inside plan_travel_internal(). The Flask route only receives
the request and extracts parameters. plan_travel_internal() initializes
the workflow state and invokes the LangGraph graph, which then runs the nodes
(coordinator, specialists, synthesizer) that update the state until
the final itinerary is produced.
4.2 Shared State
Shared State in LangGraph
The most important LangGraph concept in this app is the shared state object:
This state moves through the graph from node to node.
Each node:
reads values from state
does some work
writes new values back to state
sets current_agent to control what happens next
This is a key LangGraph mental model: stateful workflow orchestration.
Knowledge Check
How would you explain the syntax used for the messages field?
messages:Annotated[List[AnyMessage],add_messages]
Click here to see the answer
messages: Annotated[List[AnyMessage], add_messages] does two things.
List[AnyMessage] defines the type of the field: it’s a list of LangChain message objects (system, human, or AI messages).
Annotated[..., add_messages] adds LangGraph behavior that tells the graph how updates to this field should be handled.
Specifically, add_messages means that when a node writes new messages, LangGraph will append them to the existing list instead of overwriting it.
So the conversation history grows as each node adds messages.
4.3 Orchestration
Where execution begins
The main orchestration happens in plan_travel_internal():
This function implements the following application lifecycle:
build initial state
build the graph
compile it
stream execution step by step
Knowledge Check
Question 1
Why does the code use compiled_app.stream(initial_state, config) instead of
simply calling the graph once and getting the final result?
Click here to see the answer
Because streaming executes the workflow step by step as each node runs. This lets
the application observe intermediate states, track which node is executing,
and monitor the workflow in real time instead of waiting only for the final output.
Question 2
Why do we create an initial_state before running the graph?
Click here to see the answer
Because LangGraph workflows operate on a shared state object. The initial_state
provides the starting data that nodes will read from, update, and pass along as
the workflow progresses.
4.4 Defining the Graph
How the graph is defined
The graph is built explicitly in build_workflow():
Even though this uses conditional edges, the workflow is effectively linear:
start
coordinator
flight specialist
hotel specialist
activity specialist
synthesizer
end
Knowledge Check
If the workflow is effectively linear, why does the graph still use
add_conditional_edges and the should_continue() router?
Click here to see the answer
Because it makes the workflow flexible and extensible. Even though the current flow
is linear, the routing function allows the graph to dynamically decide the next node
based on the state. This makes it easy to add branching, retries, or different
execution paths later without redesigning the graph.
4.5 Defining Nodes
How a node works
A LangGraph node in this app is just a Python function that accepts state and returns updated state.
For example, the flight specialist:
defflight_specialist_node(state:PlannerState)->PlannerState:llm=_create_llm("flight_specialist",temperature=0.4,session_id=state["session_id"])step=(f"Find an appealing flight from {state['origin']} to {state['destination']} "f"departing {state['departure']} for {state['travellers']} travellers.")messages=[SystemMessage(content="You are a flight booking specialist. Provide concise options."),HumanMessage(content=step),]result=llm.invoke(messages)state["flight_summary"]=result.contentstate["messages"].append(result)state["current_agent"]="hotel_specialist"returnstate
This exhibits the common node pattern:
create or access an LLM
build a prompt from structured state
invoke the model
save the result into state
set the next node
The hotel and activity nodes follow the same structure, which makes the workflow easy to explain.
Knowledge Check
When creating the LLM for the flight_specialist node, we specified
a temperature of 0.4. What does this mean?
Click here to see the answer
Temperature controls how random or creative the model’s responses are.
Lower temperature (e.g., 0.0–0.3): more deterministic and consistent responses
Medium (around 0.4–0.7): balanced between accuracy and creativity
Higher (0.8+): more diverse and creative, but less predictable
So setting temperature=0.4 means the flight_specialist agent will produce
responses that are mostly consistent and reliable, with a small amount of
variation, which useful for tasks that need correctness but not completely rigid answers.
4.6 Message Abstractions
LangChain Message Abstractions
The application uses LangChain message abstractions rather than one long prompt string.
messages=[SystemMessage(content="You are a flight booking specialist. Provide concise options."),HumanMessage(content=step),]result=llm.invoke(messages)
Knowledge Check
How would you define system, human, and AI messages?
Click here to see the answer
In LangChain and LangGraph, messages are typically categorized by who is speaking and what role they play in guiding the conversation:
System message: Sets the rules and context for the AI’s behavior. It defines instructions, constraints, tone, and goals that guide how the model should respond throughout the interaction.
Human message: Input from the user. It contains questions, requests, or information that the AI should respond to.
AI message: The model’s response. It represents the assistant’s generated output based on the system instructions and human input.
4.7 LLM Creation
LLM Creation
The LLM itself is created here:
def_create_llm(agent_name:str,*,temperature:float,session_id:str)->AzureChatOpenAI:azure_deployment_name=os.getenv("AZURE_OPENAI_DEPLOYMENT_NAME")azure_openai_api_version=os.getenv("AZURE_OPENAI_API_VERSION")returnAzureChatOpenAI(azure_deployment=azure_deployment_name,openai_api_version=azure_openai_api_version,temperature=temperature,model_name=azure_deployment_name,# AZURE_OPENAI_API_KEY and AZURE_OPENAI_ENDPOINT environment variables will be used to connect to the LLM)
This approach separates model configuration from workflow logic.
Different nodes can use different temperatures depending on how deterministic or
creative they should be.
Knowledge Check
How would you create an LLM for OpenAI (rather than Azure OpenAI?)
Click here to see the answer
Creating an LLM for OpenAI has a few differences. The function would return a ChatOpenAI
object instead of AzureChatOpenAI.
With OpenAI directly, you don’t use the Azure-specific parameters (azure_deployment,
openai_api_version, Azure endpoint). Instead, you specify the model name and rely
on the standard OPENAI_API_KEY environment variable.
Here’s an example:
def_create_llm(agent_name:str,*,temperature:float,session_id:str)->ChatOpenAI:model_name=os.getenv("OPENAI_MODEL_NAME","gpt-4o-mini")returnChatOpenAI(model=model_name,temperature=temperature,# Uses OPENAI_API_KEY automatically from environment)
4.8 Decomposition Pattern
The synthesizer shows the decomposition pattern
The final node combines the specialist outputs into one answer.
defplan_synthesizer_node(state:PlannerState)->PlannerState:llm=_create_llm("plan_synthesizer",temperature=0.3,session_id=state["session_id"])content=json.dumps({"flight":state["flight_summary"],"hotel":state["hotel_summary"],"activities":state["activities_summary"],},indent=2,)response=llm.invoke([SystemMessage(content="You are the travel plan synthesiser. Combine the specialist insights into a concise, structured itinerary."),HumanMessage(content=(f"Traveller request: {state['user_request']}\n\n"f"Origin: {state['origin']} | Destination: {state['destination']}\n"f"Dates: {state['departure']} to {state['return_date']}\n\n"f"Specialist summaries:\n{content}")),])state["final_itinerary"]=response.contentstate["messages"].append(response)state["current_agent"]="completed"returnstate
This is a classic pattern for agentic apps:
decompose work into specialists
collect intermediate outputs
synthesize into a final response
That is one of the main architectural ideas you should take away from this overview.
Knowledge Check
Why does the app use a separate plan_synthesizer node instead of letting
one agent generate the entire travel plan?
Click here to see the answer
Because the system breaks the problem into specialized tasks first (flights, hotels, activities).
Each specialist produces a focused summary, and the plan_synthesizer node then combines those
outputs into one coherent itinerary.
This pattern improves modularity, reliability, and observability, since each agent
handles a smaller problem and the final node integrates the results.