The aim of this module is for you to configure your personal profile which controls how you will be notified by Splunk On-Call whenever you get paged.
1. Contact Methods
Switch to the Splunk On-Call UI and click on your login name in the top right hand corner and chose Profile from the drop down. Confirm your contact methods are listed correctly and add any additional phone numbers and e-mail address you wish to use.
2. Mobile Devices
To install the Splunk On-Call app for your smartphone search your phones App Store for Splunk On-Call to find the appropriate version of the app. The publisher should be listed as VictorOps Inc.
Install the App and login, then refresh the Profile page and your device should now be listed under the devices section. Click the Test push notification button and confirm you receive the test message.
3. Personal Calendar
This link will enable you to sync your on-call schedule with your calendar, however as you do not have any allocated shifts yet this will currently be empty. You can add it to your calendar by copying the link into your preferred application and setting it up as a new subscription.
4. Paging Policies
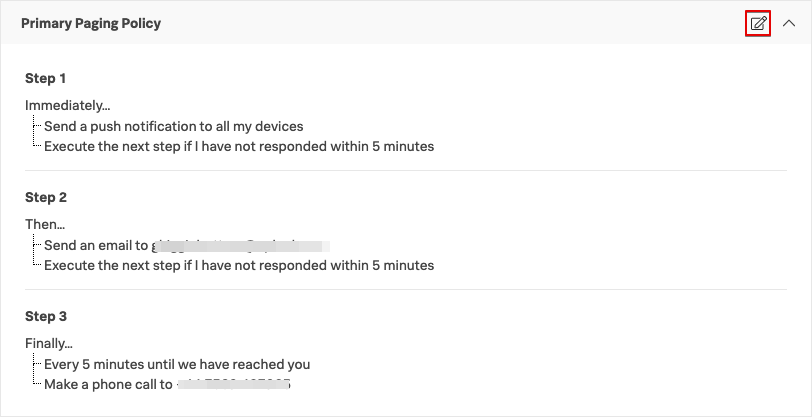
Paging Polices specify how you will be contacted when on-call. The Primary Paging Policy will have defaulted to sending you an SMS assuming you added your phone number when activating your account. We will now configure this policy into a three tier multi-stage policy similar to the image below.
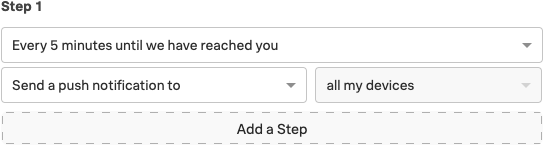
4.1 Send a push notification
Click the edit policy button in the top right corner for the Primary Paging Policy.
Send a push notification to all my devices
Execute the next step if I have not responded within 5 minutes
Click Add a Step
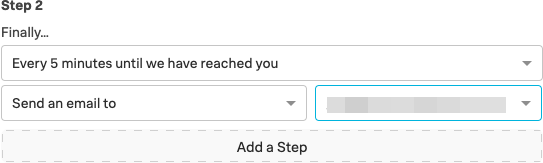
4.2 Send an e-mail
Send an e-mail to [your email address]
Execute the next step if I have not responded within 5 minutes
Click Add a Step
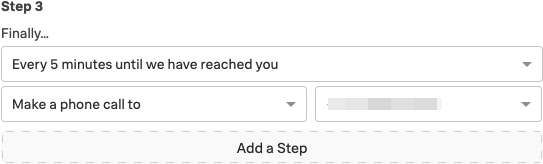
4.3 Call your number
Every 5 minutes until we have reached you
Make a phone call to [your phone number]
Click Save to save the policy.
When you are on-call or in the escalation path of an incident, you will receive notifications in this order following these time delays.
To cease the paging you must acknowledge the incident. Acknowledgements can occur in one of the following ways:
Expanding the Push Notification on your device and selecting Acknowledge
Responding to the SMS with the 5 digit code included
Pressing 4 during the Phone Call
Slack Button
For more information on Notification Types, see here.
5. Custom Paging Policies
Custom paging polices enable you to override the primary policy based on the time and day of the week. A good example would be to get the system to immediately phone you whenever you get a page during the evening or weekends as this is more likely to get your attention than a push notification.
Create a new Custom Policy by clicking Add a Policy and configure with the following settings:
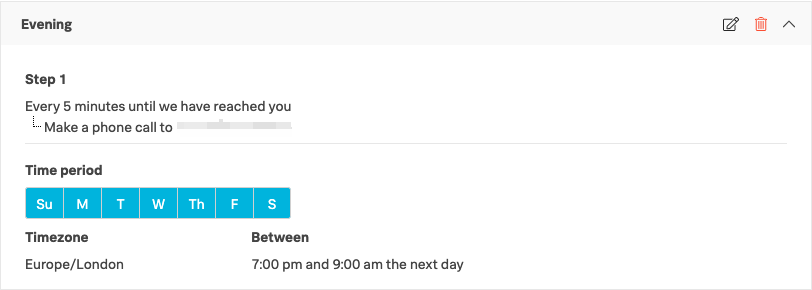
5.1 Custom evening policy
Policy Name: Evening
Every 5 minutes until we have reached you
Make a phone call to [your phone number]
Time Period: All 7 Days
Time zone
Between 7pm and 9am
Click Save to save the policy then add one more.
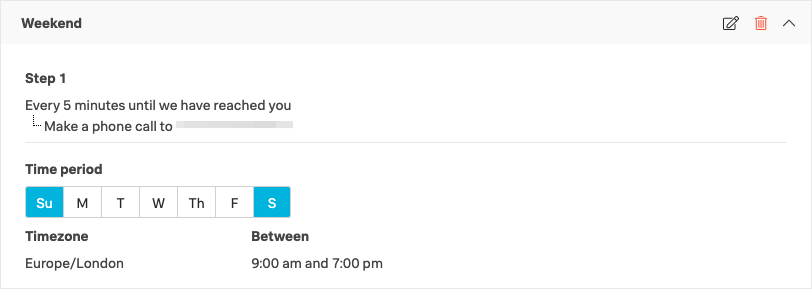
5.2 Custom weekend policy
Policy Name: Weekend
Every 5 minutes until we have reached you
Make a phone call to [your phone number]
Time Period: Sat & Sun
Time zone
Between 9am and 7pm
Click Save to save the policy.
These custom paging policies will be used during the specified times in place of the Primary Policy. However, admins do have the ability to ignore these custom policies, and we will highlight how this is achieved in a later module.
The final option here is the setting for Recovery Notifications. These are typically low priority, will default to Push, but can also be email, sms or phone call. Your profile is now fully configured using these example configurations.
Organizations will have different views on how profiles should be configured and will typically issue guidelines for paging policies and times between escalations etc.
Please wait for the instructor before proceeding to the Teams module.
Subsections of User Profile
Teams
Aim
The aim of this module is for you to complete the first step of Team configuration by adding users to your Team.
1. Find your Team
Navigate to the Teams tab on the main toolbar, you should find you that a Team has been created for you as part of the workshop pre-setup and you would have been informed of your Team Name via e-mail.
If you have found your pre-configured Team, skip Step 2. and proceed to Step 3. Configure Your Team. However, if you cannot find your allocated Team, you will need to create a new one, so proceed with Step 2. Create Team
2. Create Team
Only complete this step if you cannot find your pre-allocated Team as detailed in your workshop e-mail. Select Add Team, then enter your allocated team name, this will typically be in the format of “AttendeeID Workshop” and then save by clicking the Add Team button.
3. Configure Your Team
You now need to add other users to your team. If you are running this workshop using the Splunk provided environment, the following accounts are available for testing. If you are running this lab in your own environment, you will have been provided a list of usernames you can use in place of the table below.
These users are dummy accounts who will not receive notifications when they are on call.
Name
Username
Shift
Duane Chow
duanechow
Europe
Steven Gomez
gomez
Europe
Walter White
heisenberg
Europe
Jim Halpert
jimhalpert
Asia
Lydia Rodarte-Quayle
lydia
Asia
Marie Schrader
marie
Asia
Maximo Arciniega
maximo
West Coast
Michael Scott
michaelscott
West Coast
Tuco Salamanca
tuco
West Coast
Jack Welker
jackwelker
24/7
Hank Schrader
hank
24/7
Pam Beesly
pambeesly
24/7
Add the users to your team, using either the above list or the alternate one provided to you. The value in the Shift column can be ignored for now, but will be required for a later step.
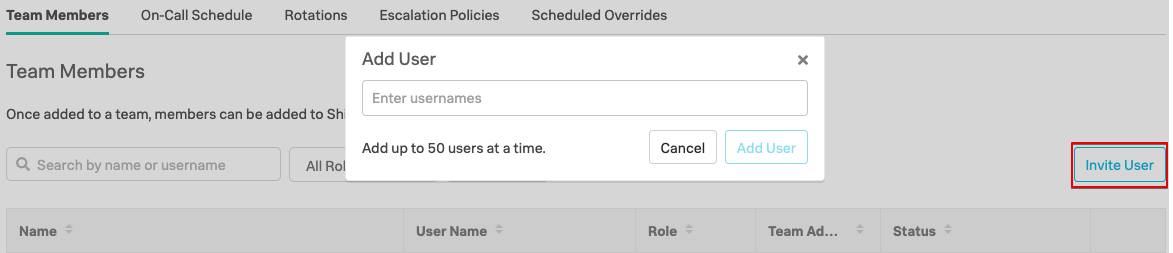
Click Invite User button on the right hand side, then either start typing the usernames (this will filter the list), or copy and paste them into the dialogue box. Once all users are added to the list click the Add User button.
To make a team member a Team Admin, simply click the :fontawesome-regular-edit: icon in the right hand column, pick any user and make them an Admin.
Tip
For large team management you can use the APIs to streamline this process.
A rotation is a recurring schedule, that consists of one or more shifts, with members who rotate through a shift.
The aim of this module is for you to configure two example Rotations, and assign Team Members to the Rotations.
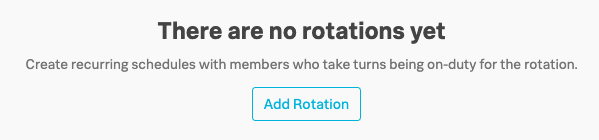
Navigate to the Rotations tab on the Teams sub menu, you should have no existing Rotations so we need to create some.
The 1st Rotation you will create is for a follow the sun support pattern where the members of each shift provide cover during their normal working hours within their time zone.
The 2nd will be a Rotation used to provide escalation support by more experienced senior members of the team, based on a 24/7, 1 week shift pattern.
1. Follow the Sun Support - Business Hours
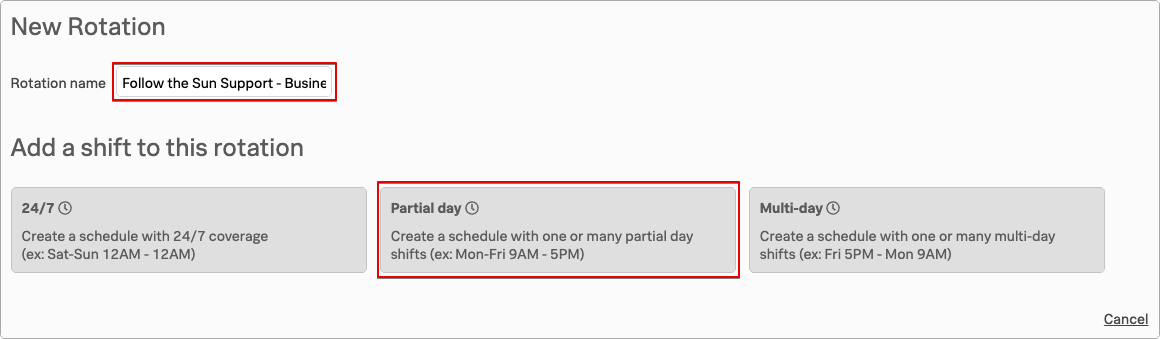
Click Add Rotation
Enter a name of “Follow the Sun Support - Business Hours” and Select Partial day from the three available shift templates.
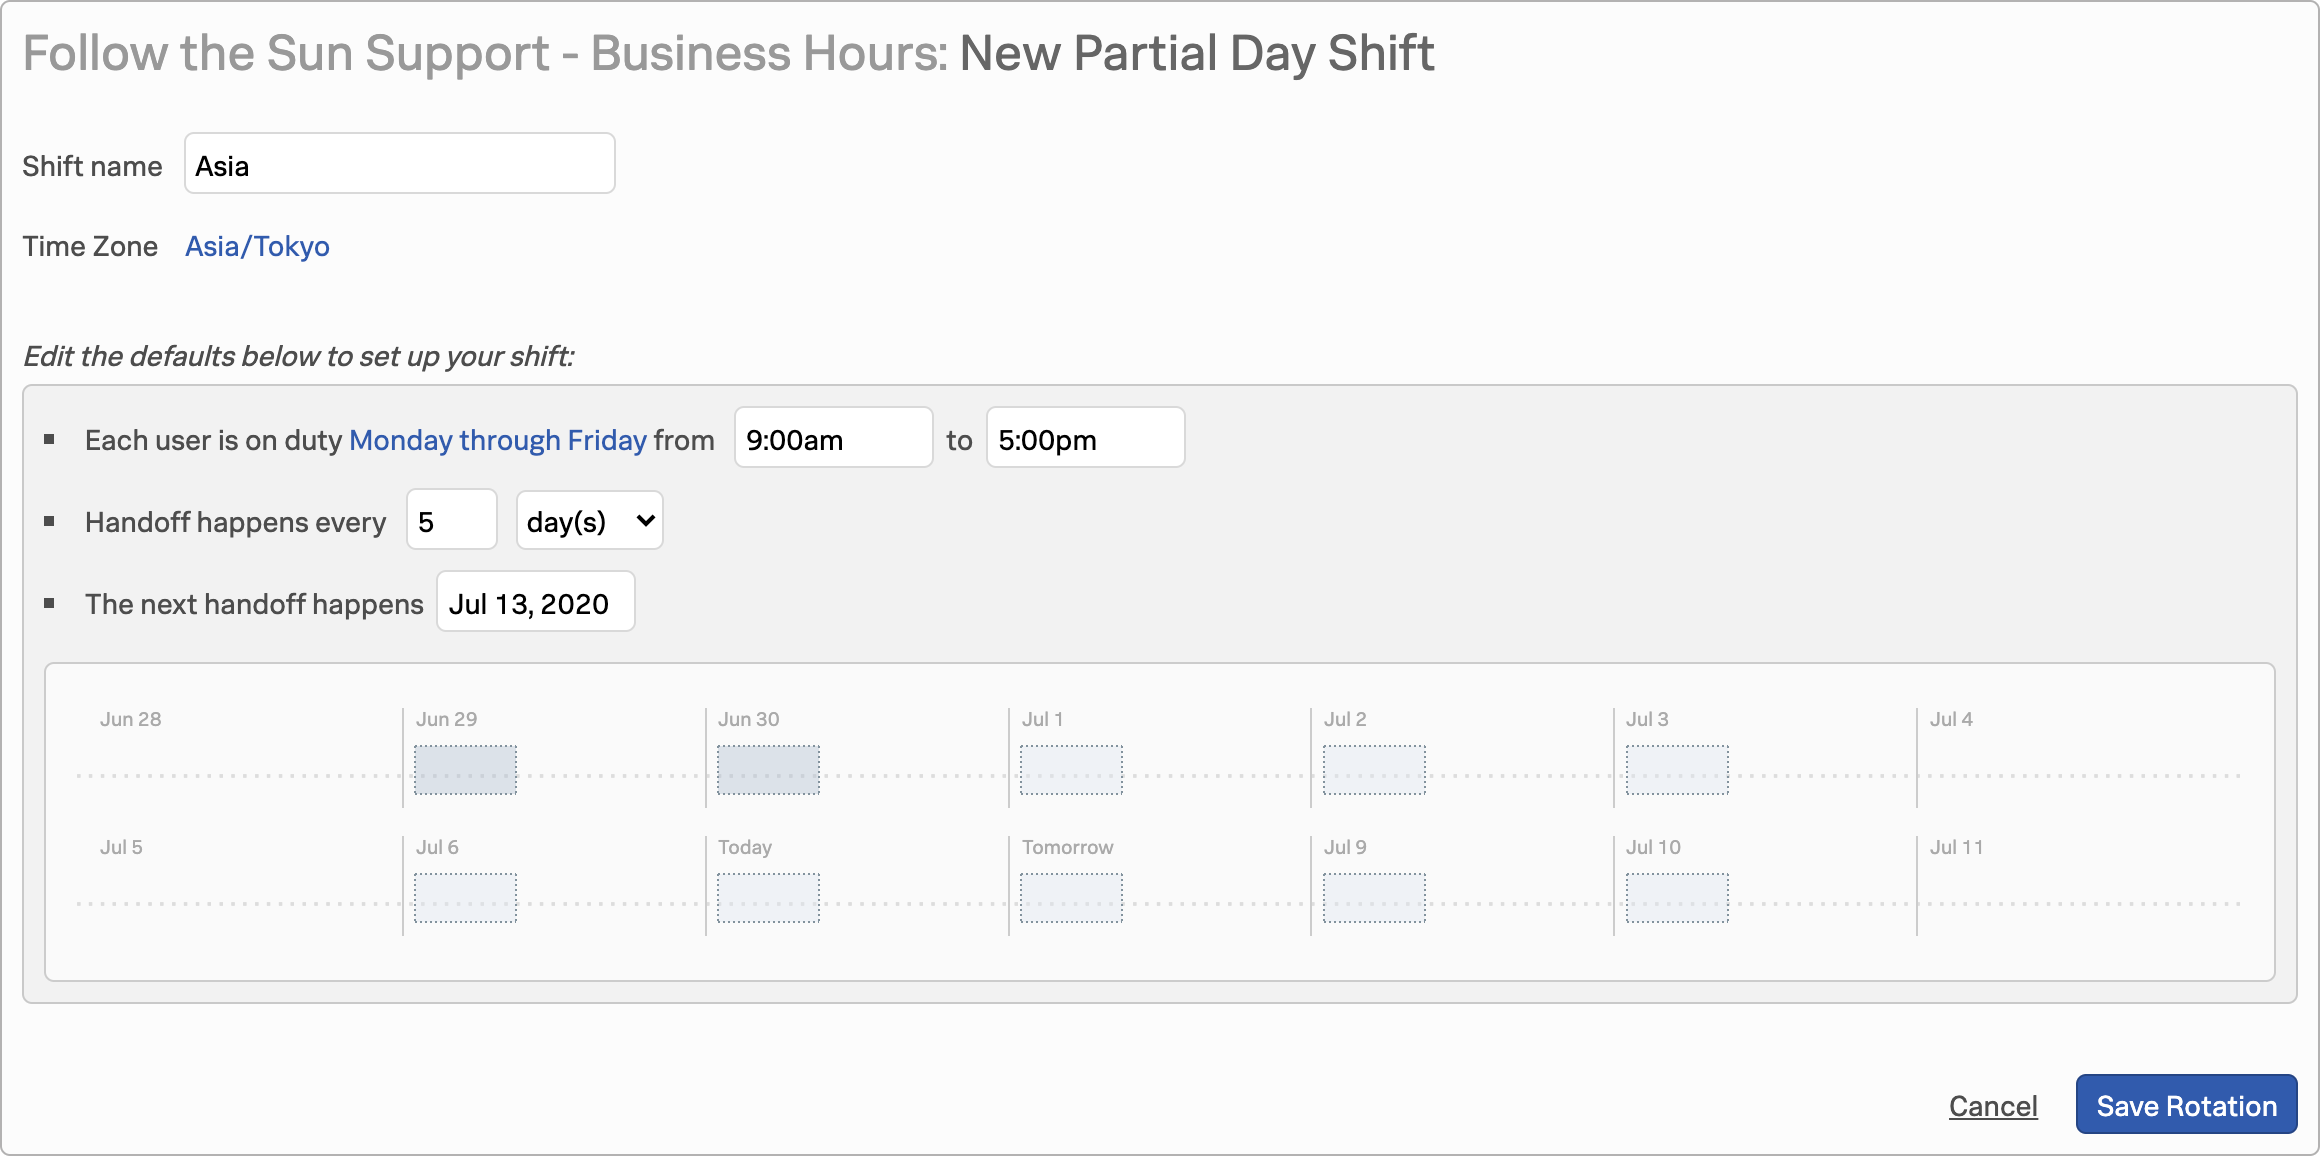
Enter a Shift name of “Asia”
Time Zone set to “Asia/Tokyo”
Each user is on duty from “Monday through Friday from 9.00am to 5.00pm”
Handoff happens every “5 days”
The next handoff happens - Select the next Monday using the calendar
Click Save Rotation
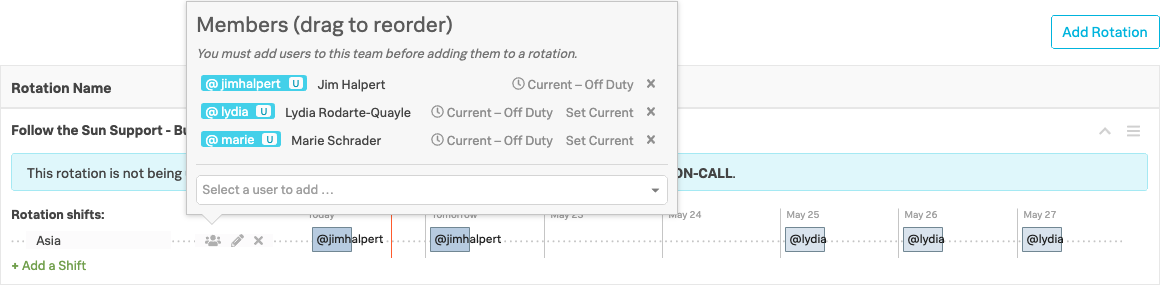
You will now be prompted to add Members to this shift; add the Asia members who are Jim Halpert, Lydie Rodarte-Quayle and Marie Schrader, but only if you’re using the Splunk provided environment for this workshop.
If you’re using your own Organisation refer to the specific list provided separately.
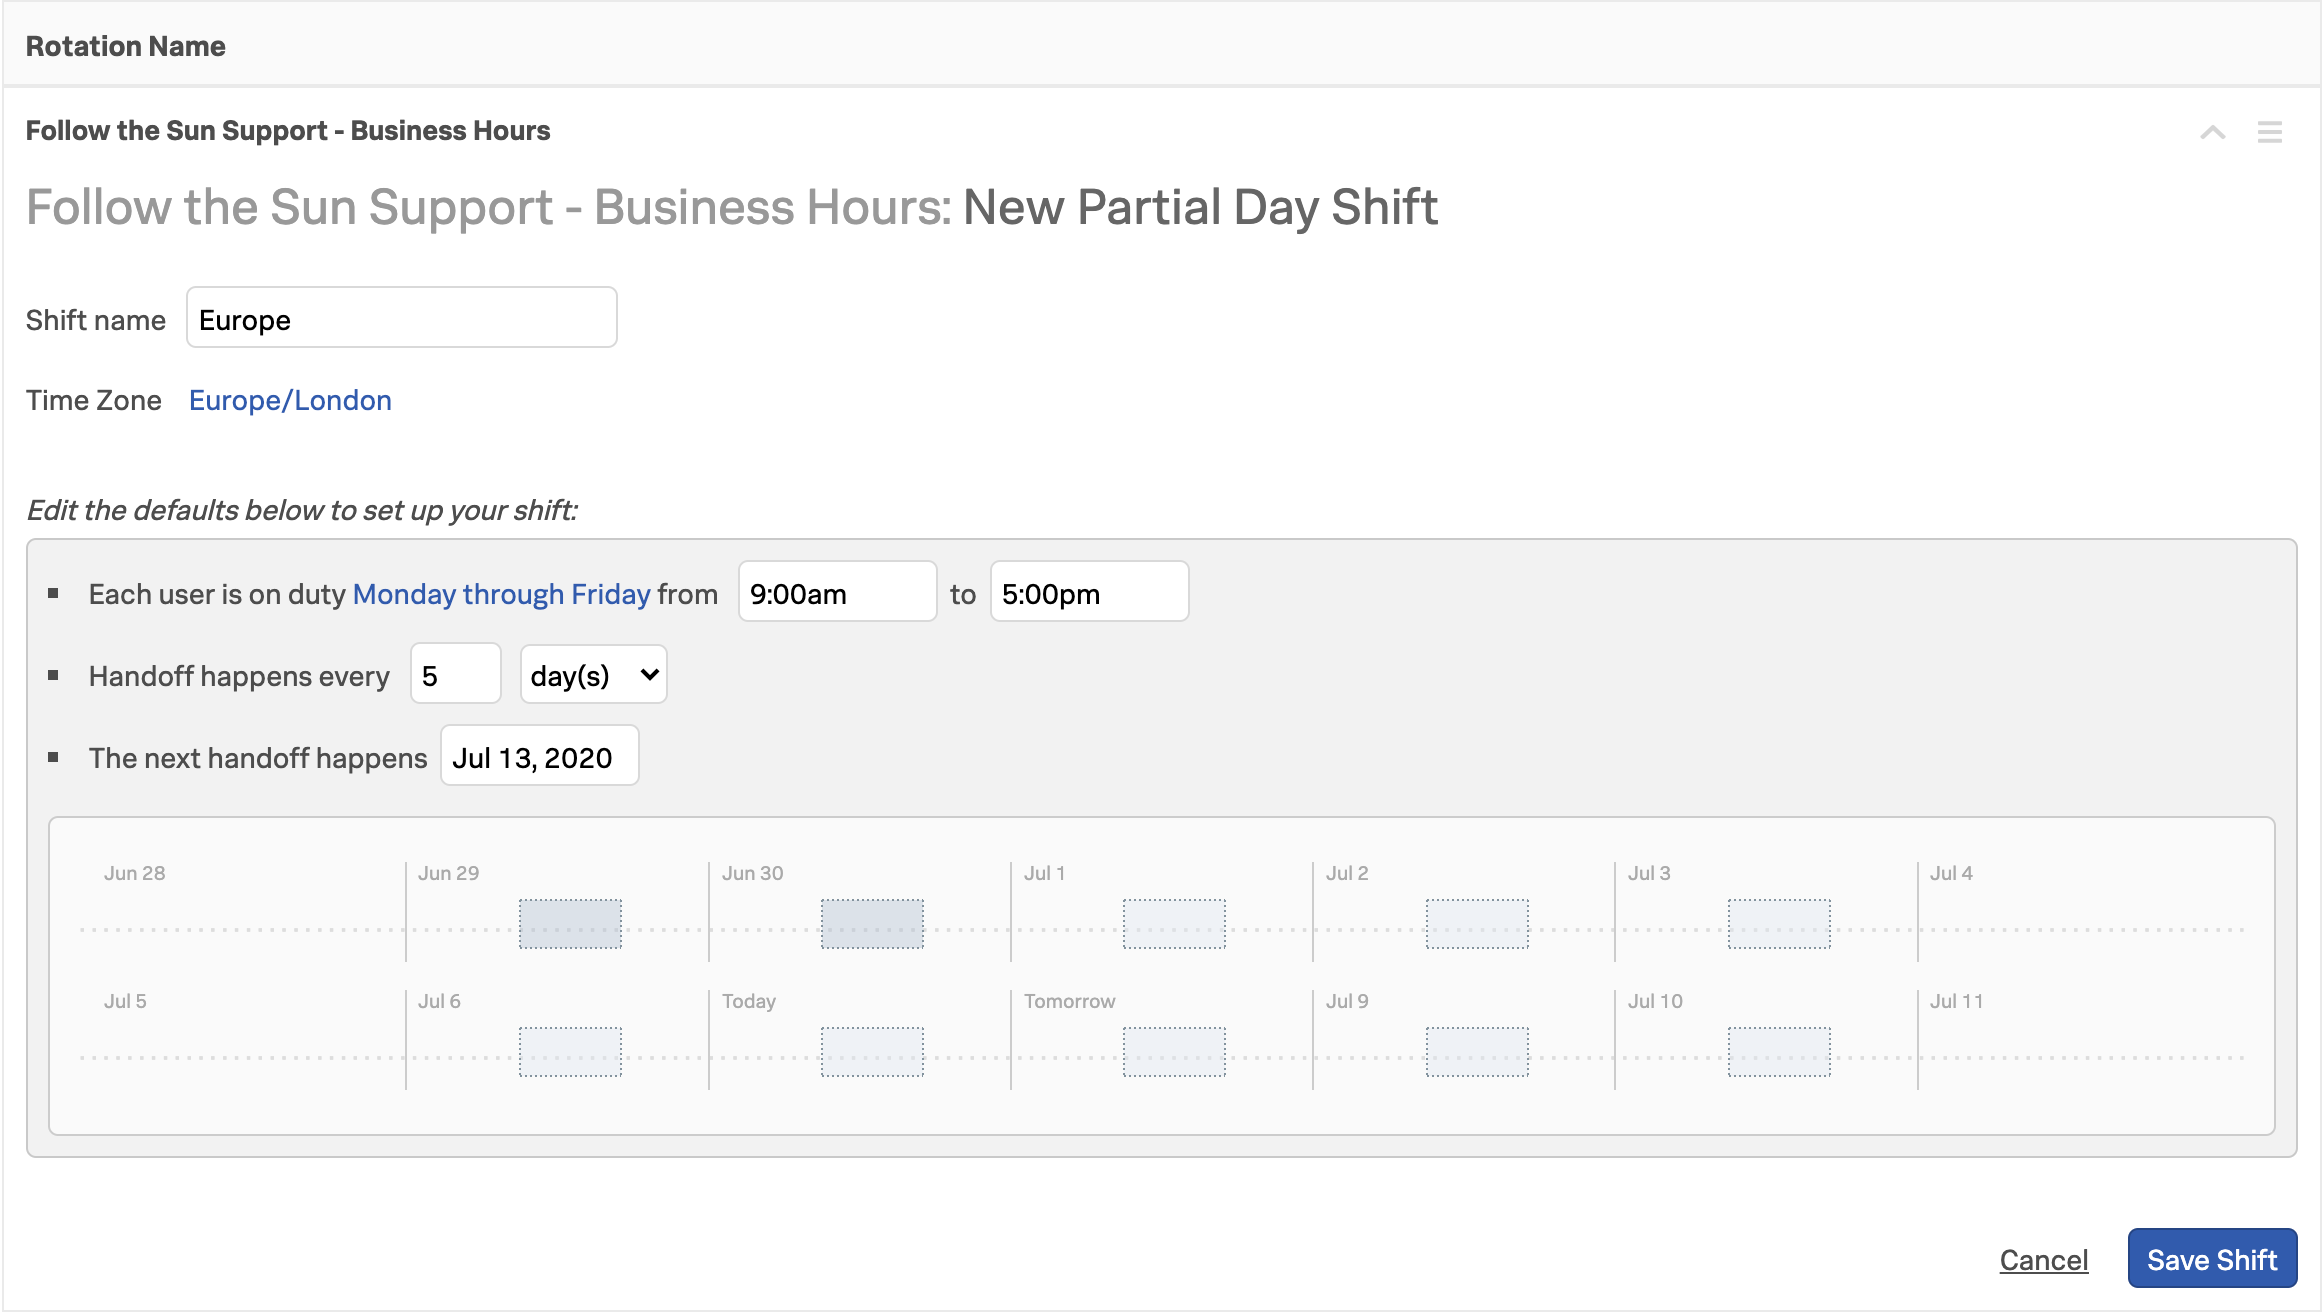
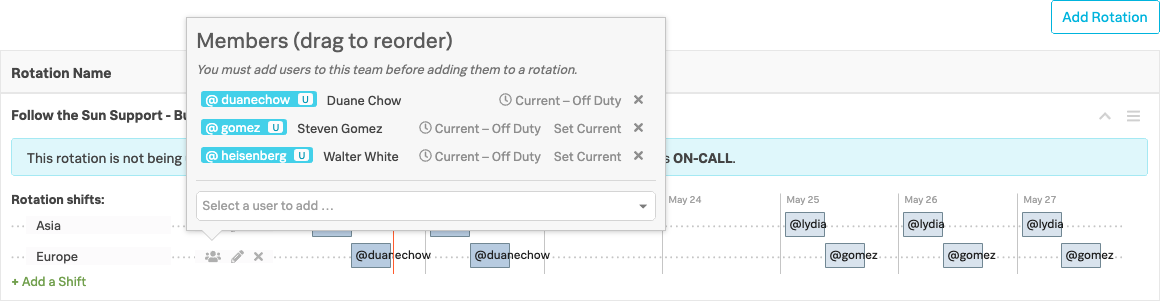
Now add an 2nd shift for Europe by again clicking +Add a shift → Partial Day
Enter a Shift name of “Europe”
Time Zone set to “Europe/London”
Each user is on duty from “Monday through Friday from 9.00am to 5.00pm”
Handoff happens every “5 days”
The next handoff happens - Select the next Monday using the calendar
Click Save Shift
You will again be prompted to add Members to this shift; add the Europe members who are Duane Chow, Steven Gomez and Walter White, but only if you’re using the Observability Workshop Org for this workshop.
If you’re using your own Organisation refer to the specific list provided separately.
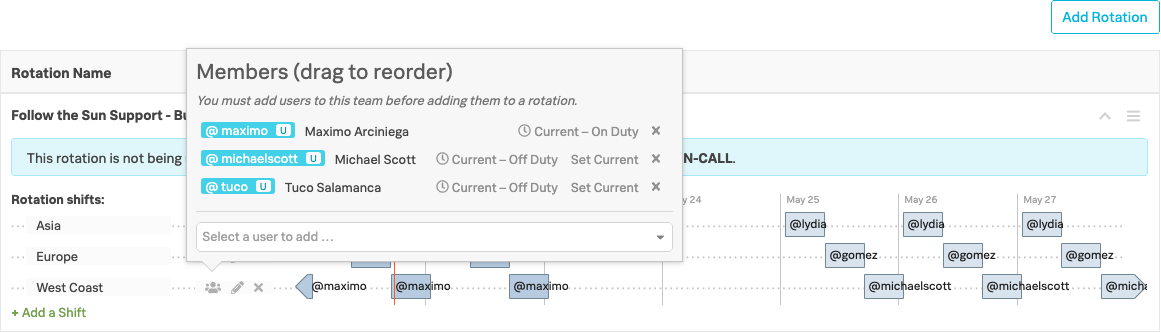
Now add a 3rd shift for West Coast USA by again clicking +Add a shift - Partial Day
Enter a Shift name of “West Coast”
Time Zone set to “US/Pacific”
Each user is on duty from “Monday through Friday from 9.00am to 5.00pm”
Handoff happens every “5 days”
The next handoff happens - Select the next Monday using the calendar
Click Save Shift
You will again be prompted to add Members to this shift; add the West Coast members who are Maximo Arciniega, Michael Scott and Tuco Salamanca, but only if you’re using the Observability Workshop Org for this workshop.
If you’re using your own Organisation refer to the specific list provided separately.
The first user added will be the ‘current’ user for that shift.
You can re-order the shifts by simply dragging the users up and down, and you can change the current user by clicking Set Current on an alternate user
You will now have three different Shift patterns, that provide cover 24hr hours, Mon - Fri, but with no cover at weekends.
We will now add another Rotation for our Senior SRE Escalation cover.
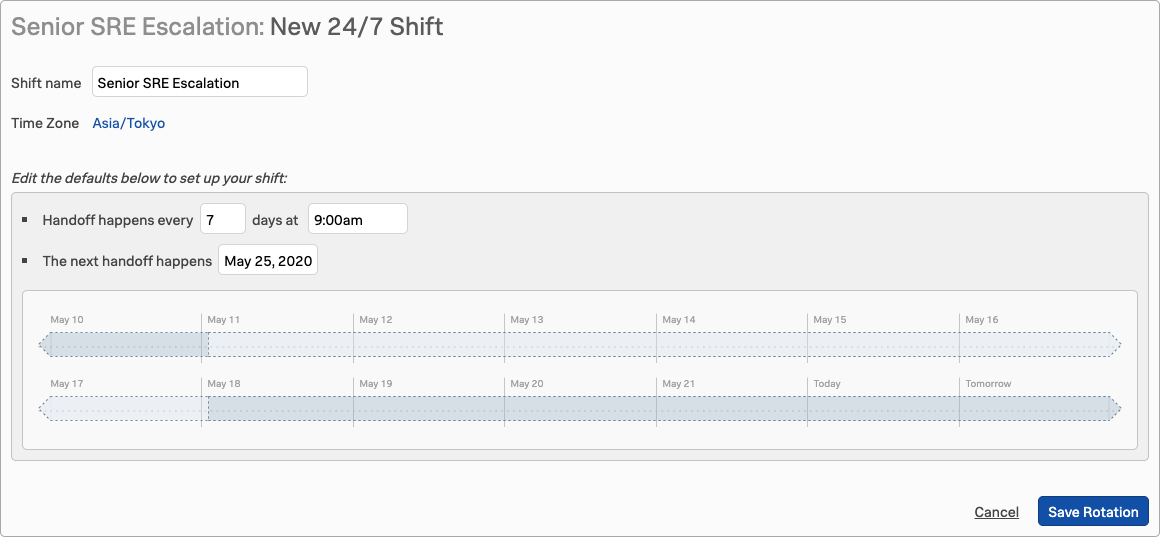
2. Senior SRE Escalation
Click Add Rotation
Enter a name of “Senior SRE Escalation”
Select 24/7 from the three available shift templates
Enter a Shift name of “Senior SRE Escalation”
Time Zone set to “Asia/Tokyo”
Handoff happens every “7 days at 9.00am”
The next handoff happens [select the next Monday from the date picker]
Click Save Rotation
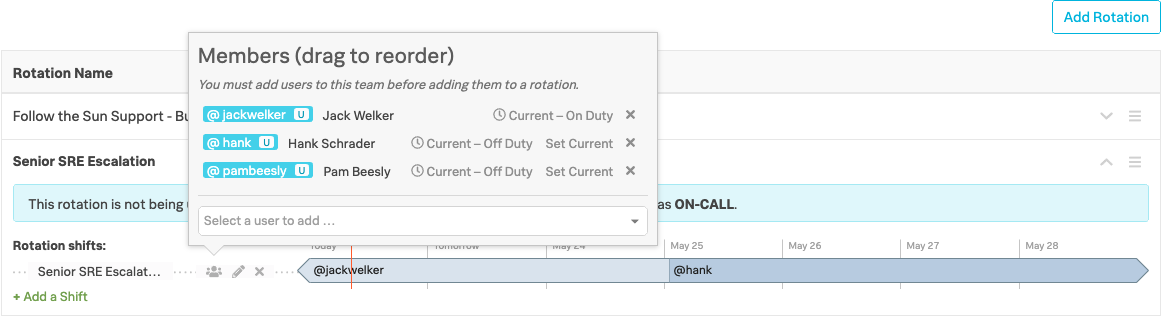
You will again be prompted to add Members to this shift; add the 24/7 members who are Jack Welker, Hank Schrader and Pam Beesly, but only if you’re using the Observability Workshop Org for this workshop.
If you’re using your own Organisation refer to the specific list provided separately.
Please wait for the instructor before proceeding to the Configuring Escalation Policies module.
Configure Escalation Policies
Aim
Escalation policies determine who is actually on-call for a given team and are the link to utilizing any rotations that have been created.
The aim of this module is for you to create three different Escalation Policies to demonstrate a number of different features and operating models.
The instructor will start by explaining the concepts before you proceed with the configuration.
Navigate to the Escalation Polices tab on the Teams sub menu, you should have no existing Polices so we need to create some.
We are going to create the following Polices to cover off three typical use cases.
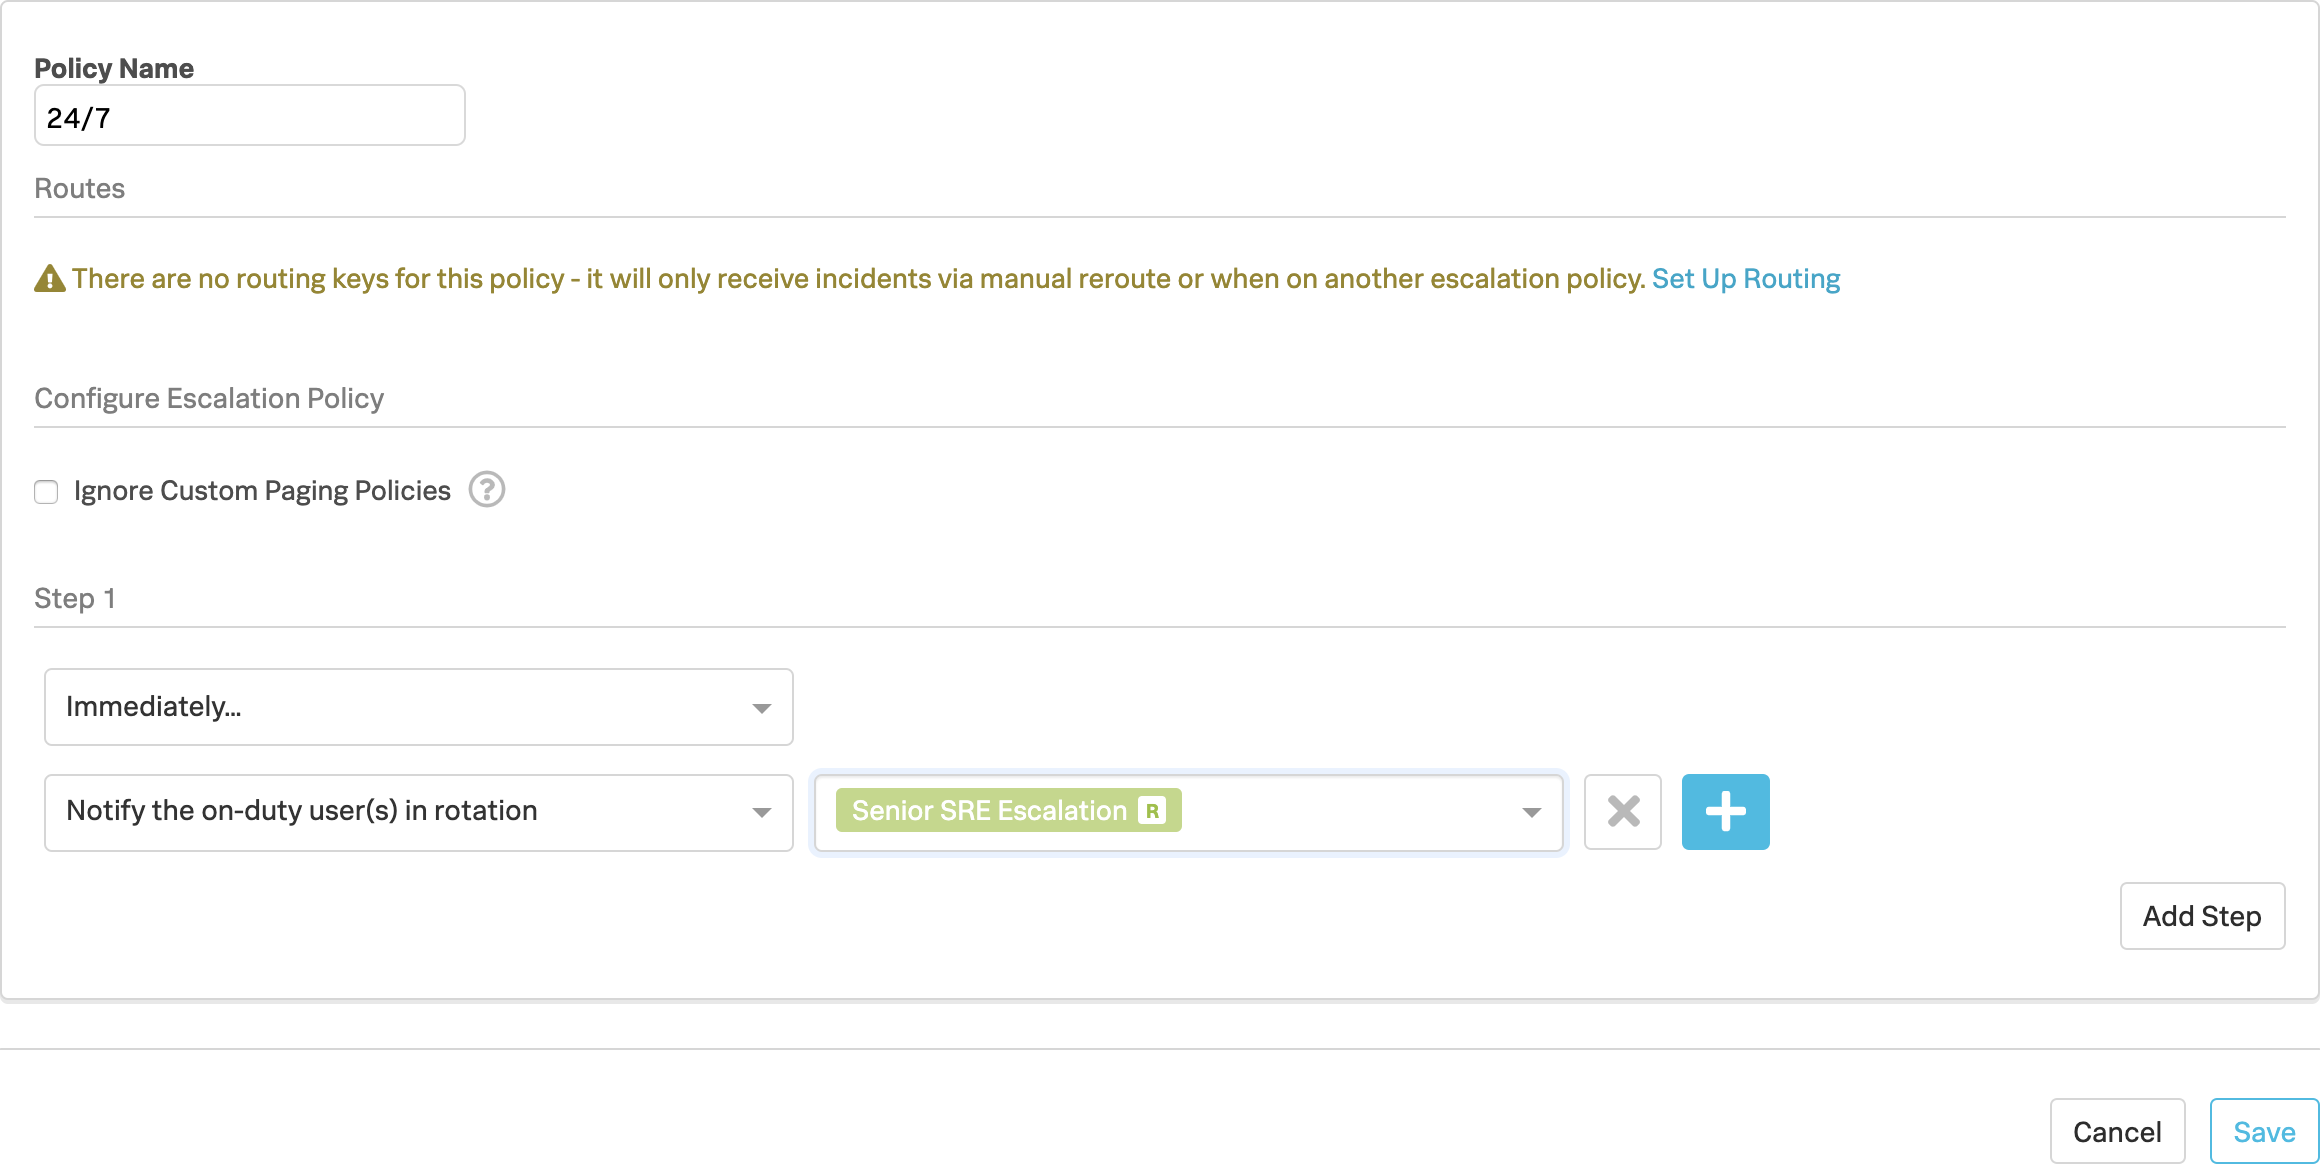
1. 24/7 Policy
Click Add Escalation Policy
Policy Name: 24/7
Step 1
Immediately
Notify the on-duty user(s) in rotation → Senior SRE Escalation
Click Save
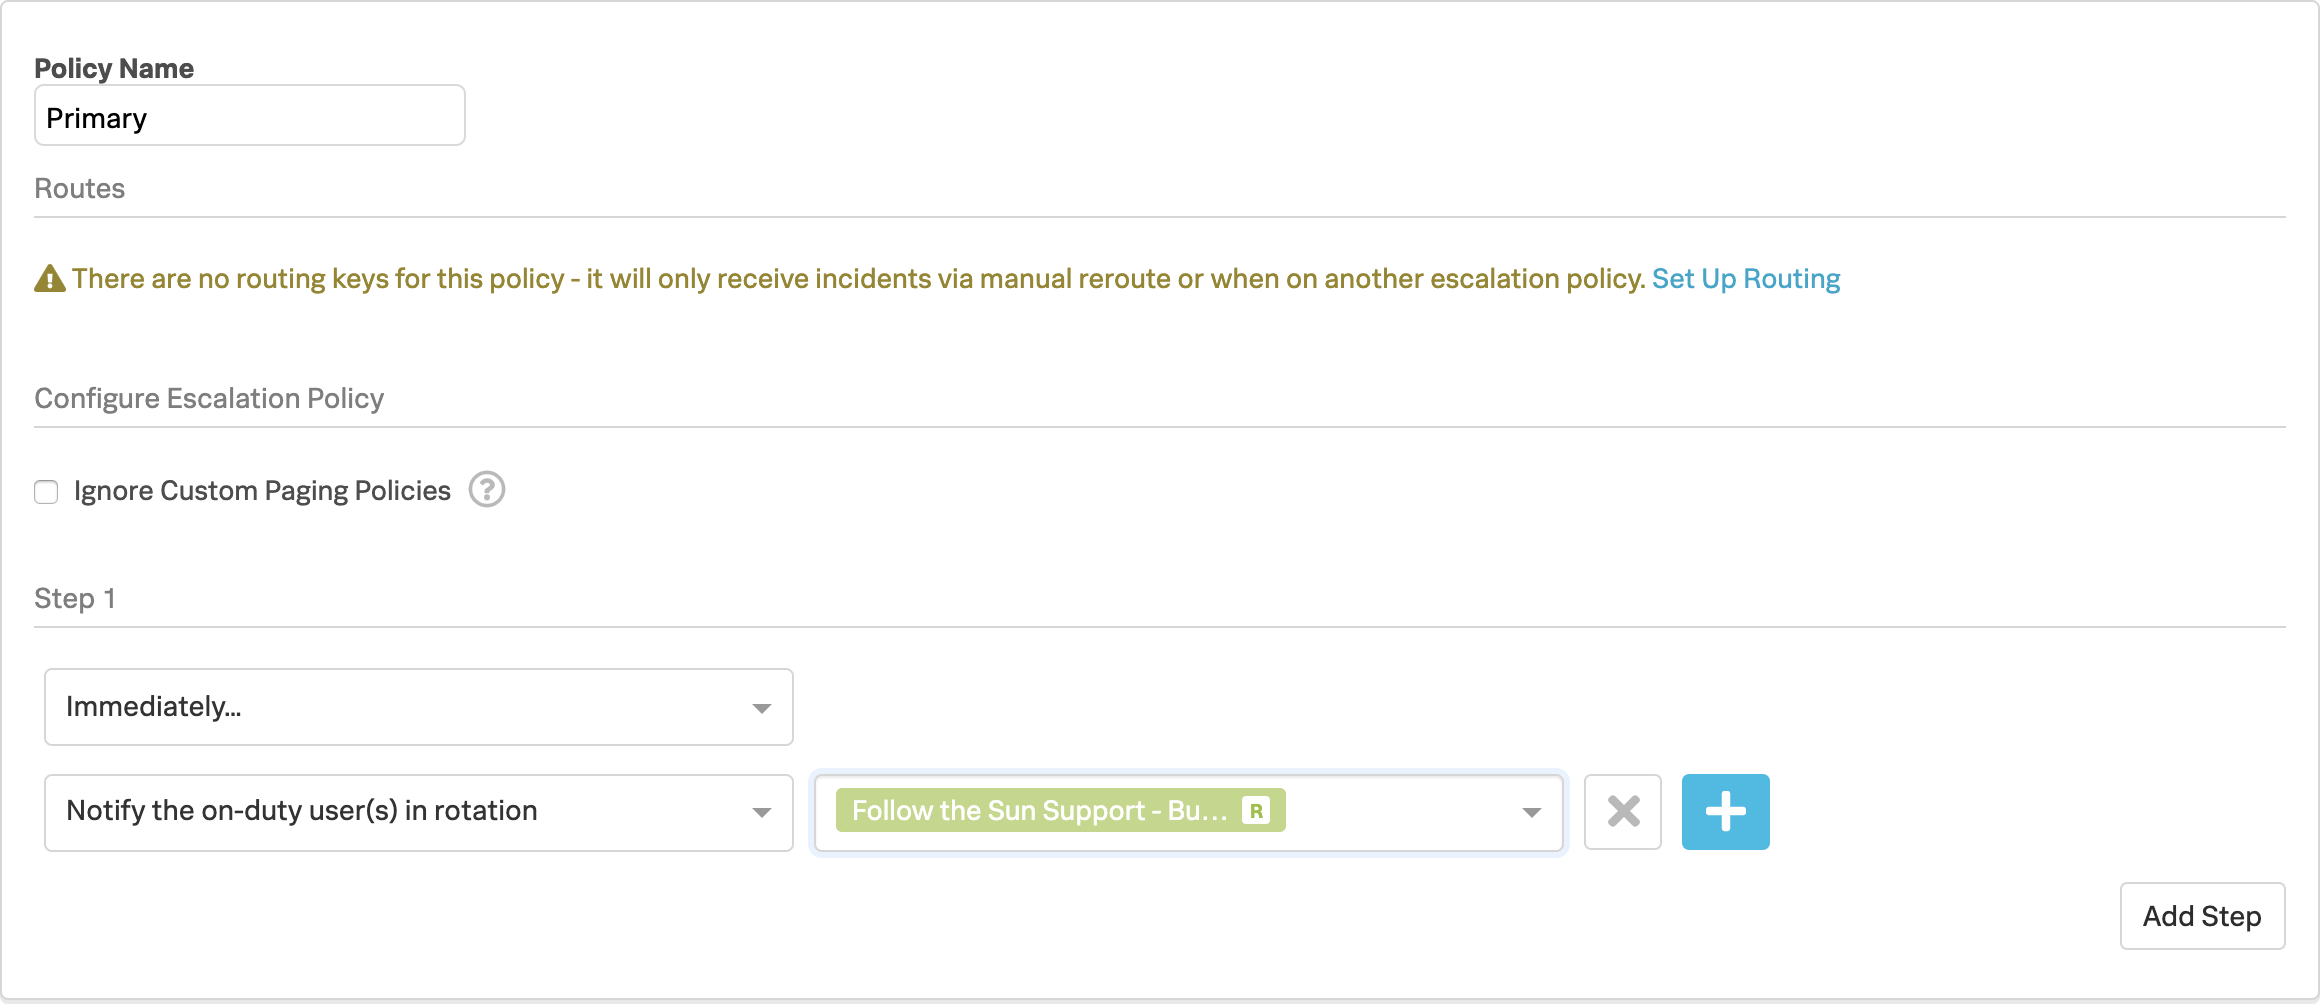
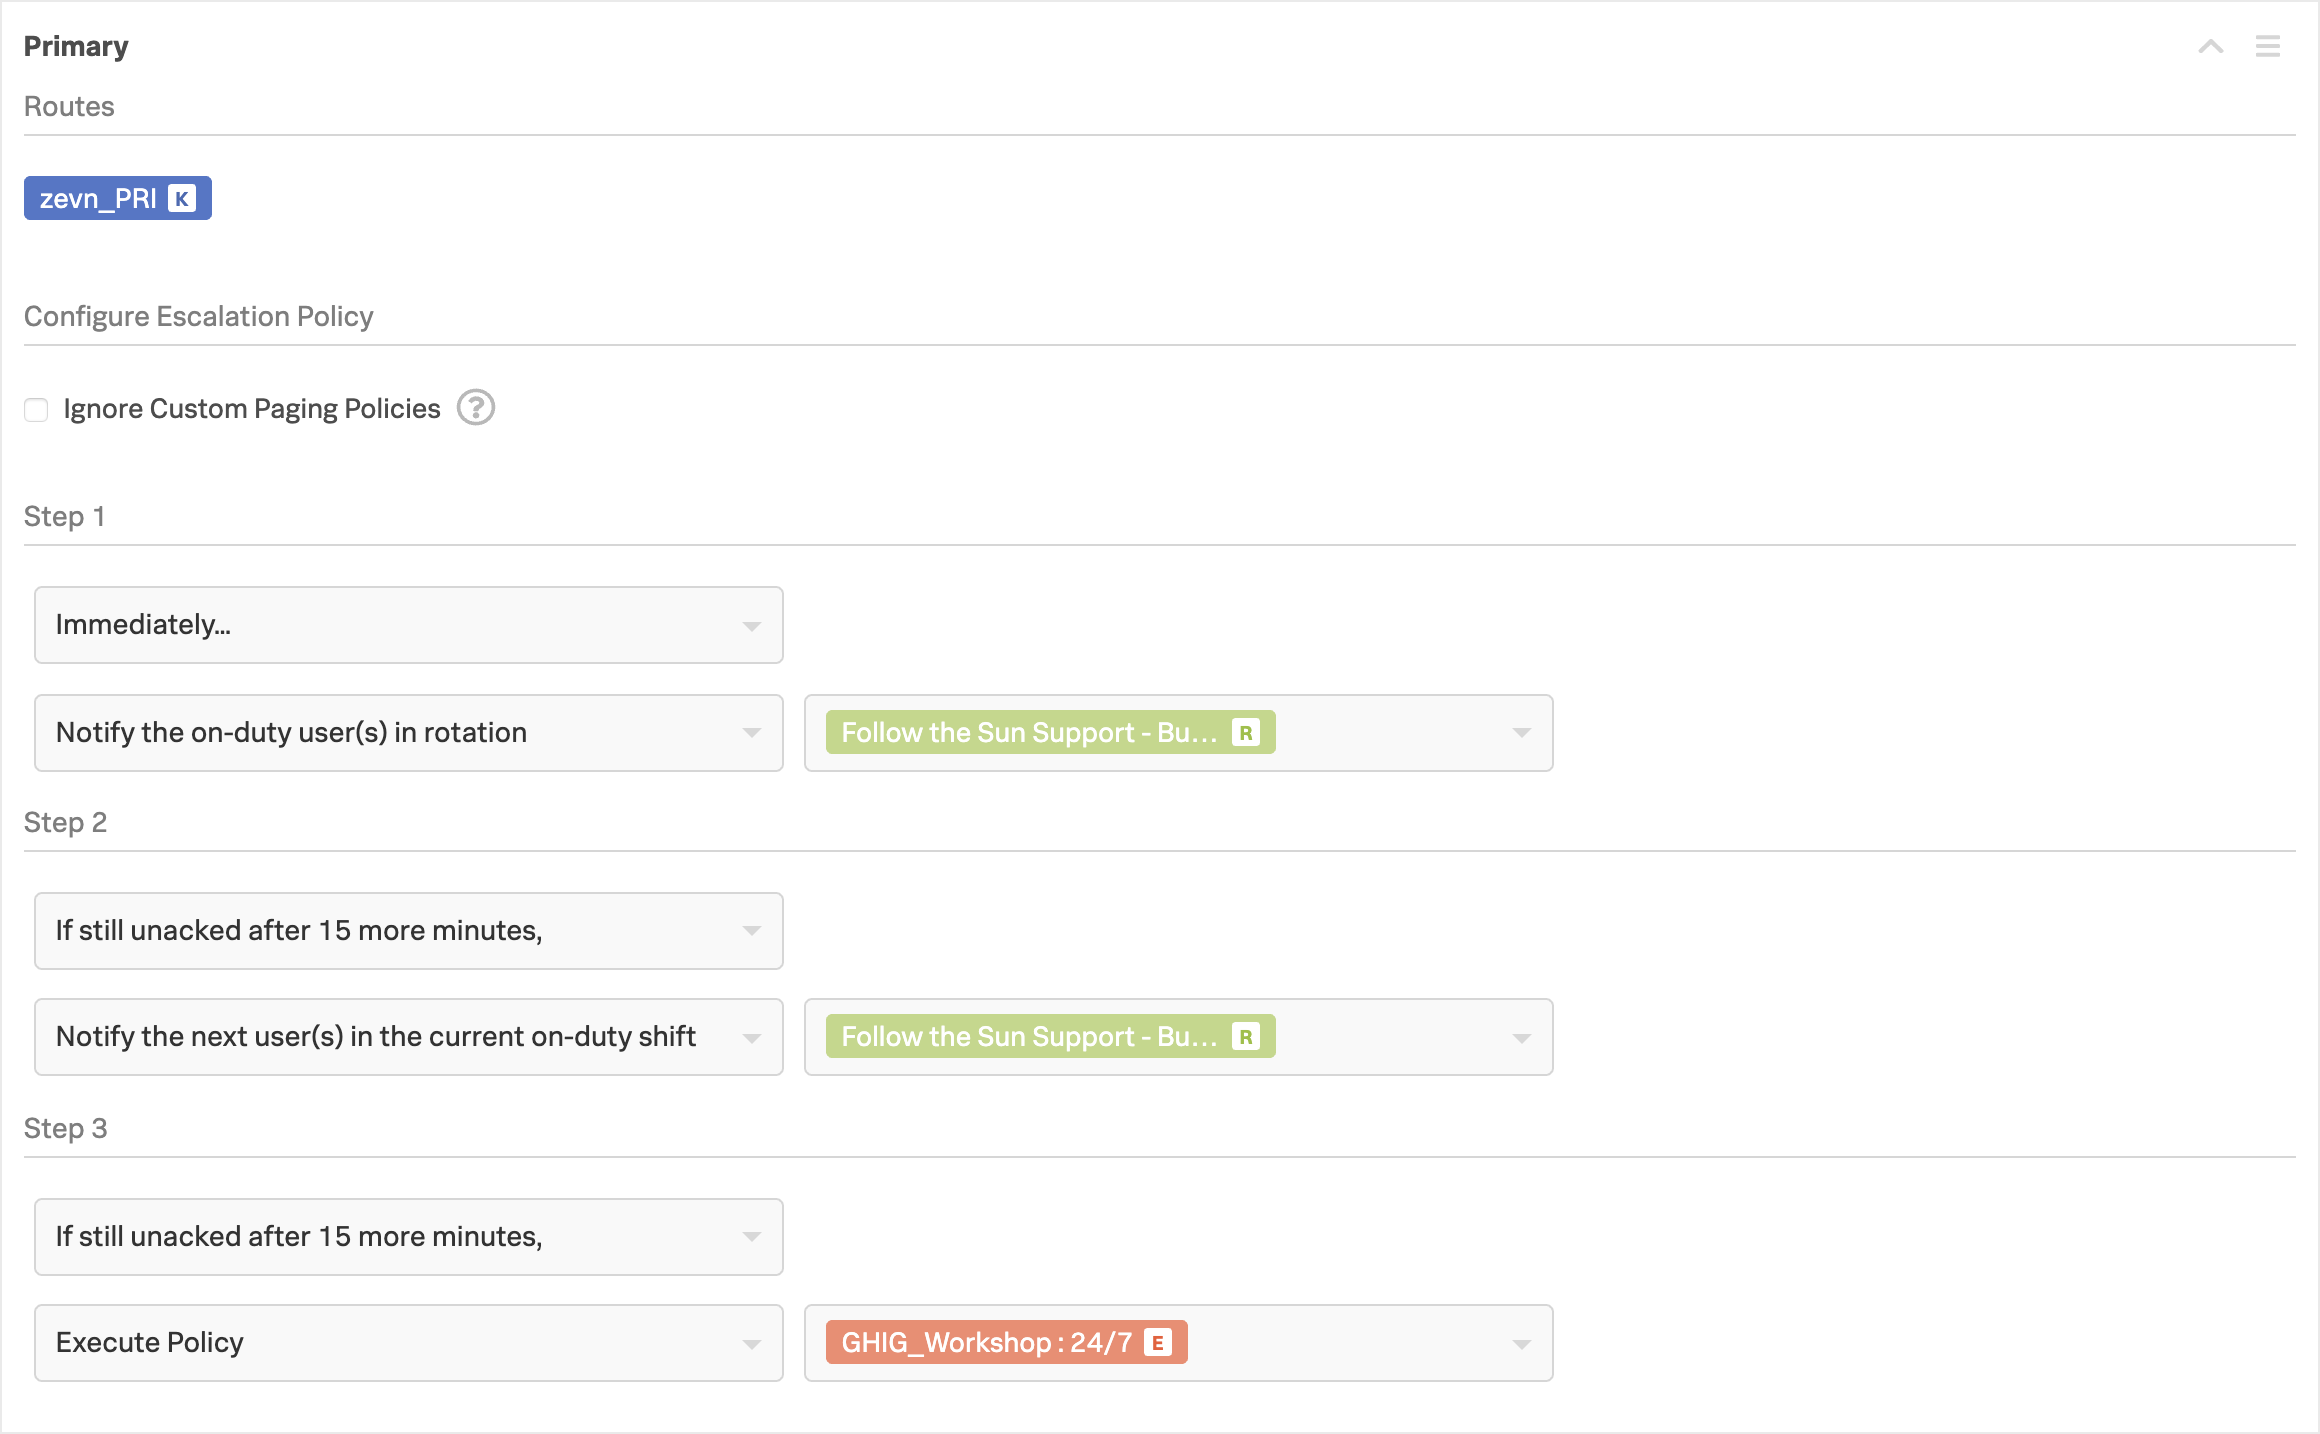
2. Primary Policy
Click Add Escalation Policy
Policy Name: Primary
Step 1
Immediately
Notify the on-duty user(s) in rotation → Follow the Sun Support - Business Hours
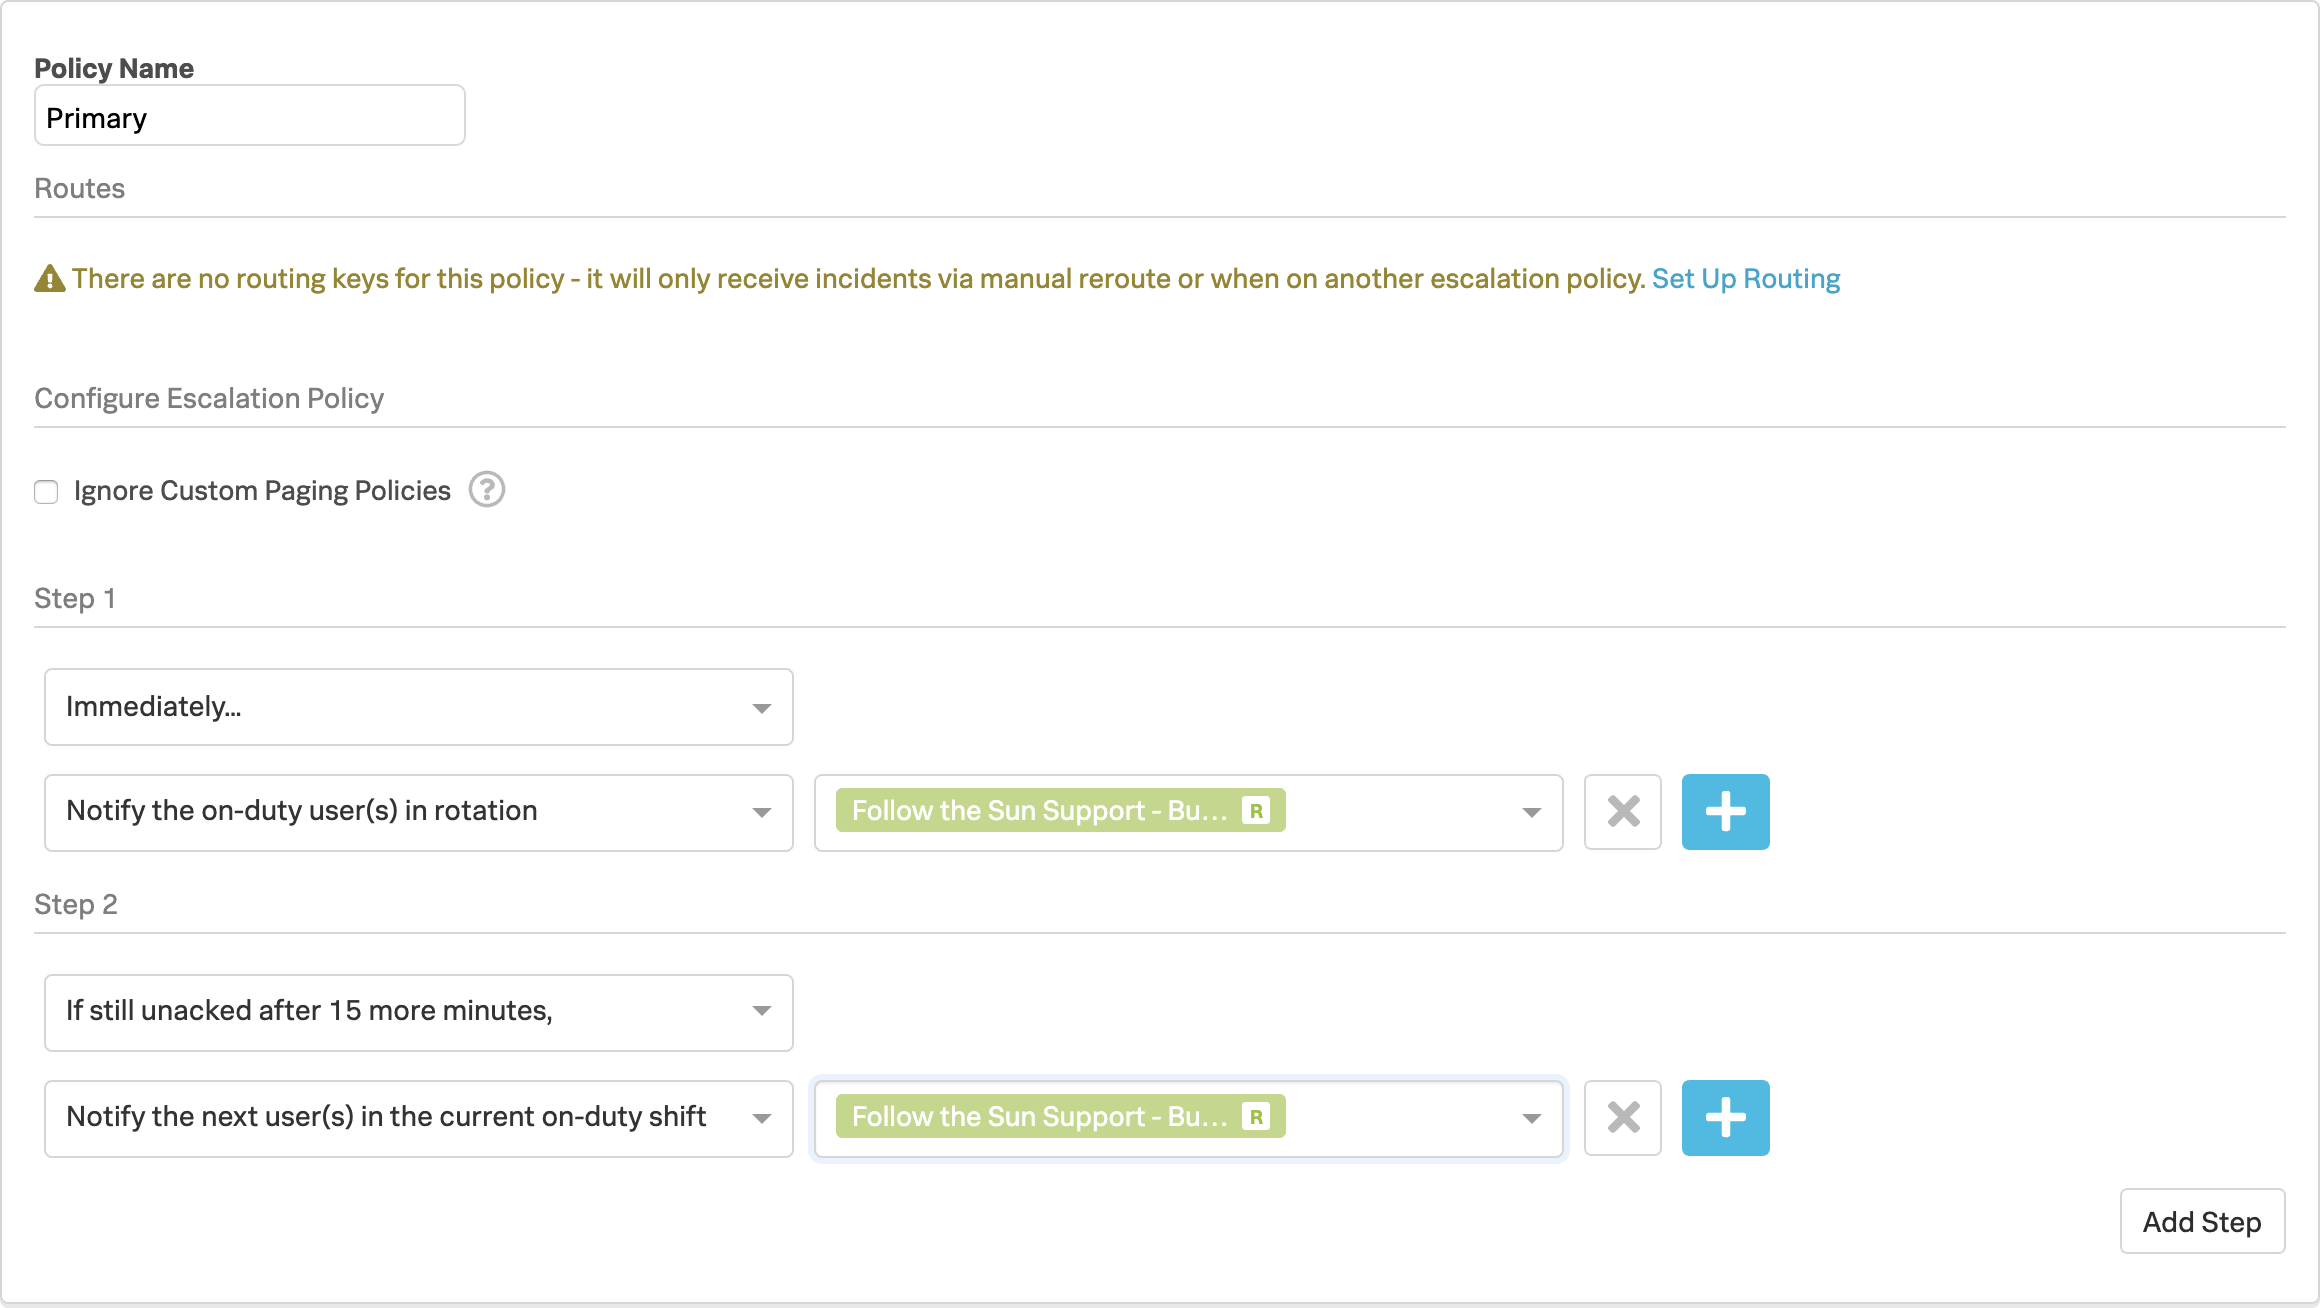
Click Add Step
Step 2
If still un-acknowledged after 15 minutes
Notify the next user(s) in the current on-duty shift → Follow the Sun Support - Business Hours
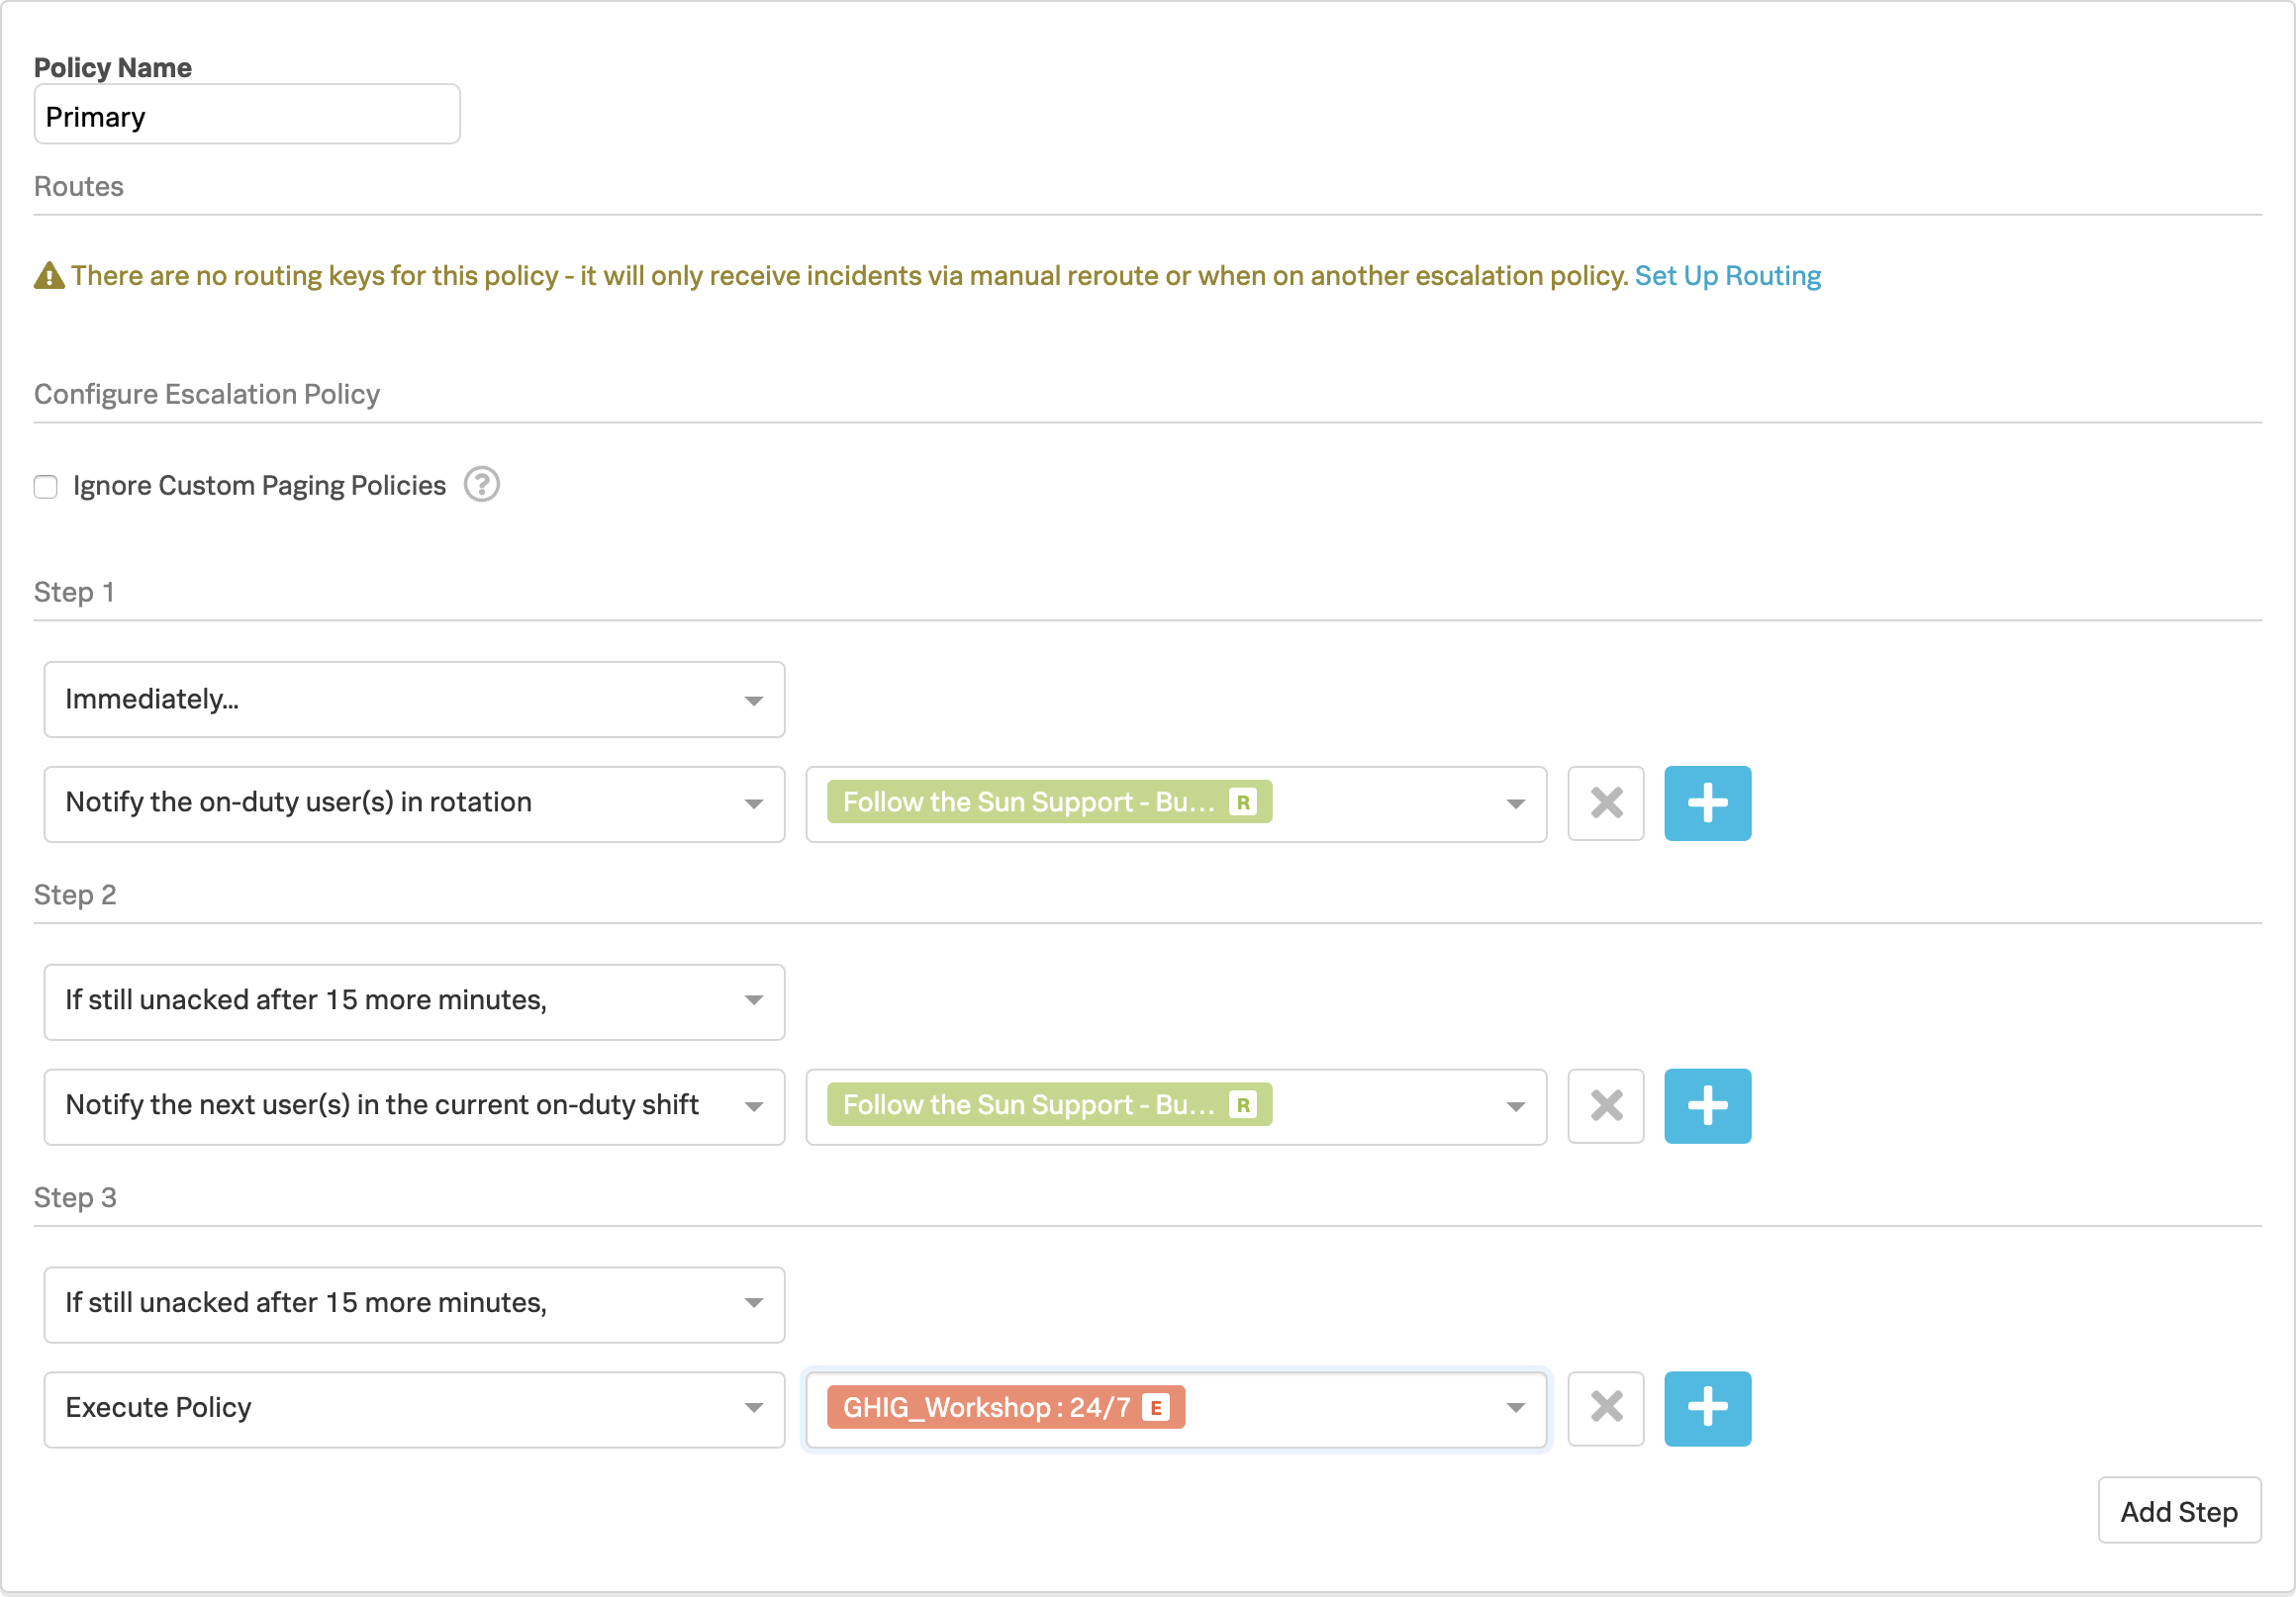
Click Add Step
Step 3
If still un-acknowledged after 15 more minutes
Execute Policy → [Your Team Name] : 24/7
Click Save
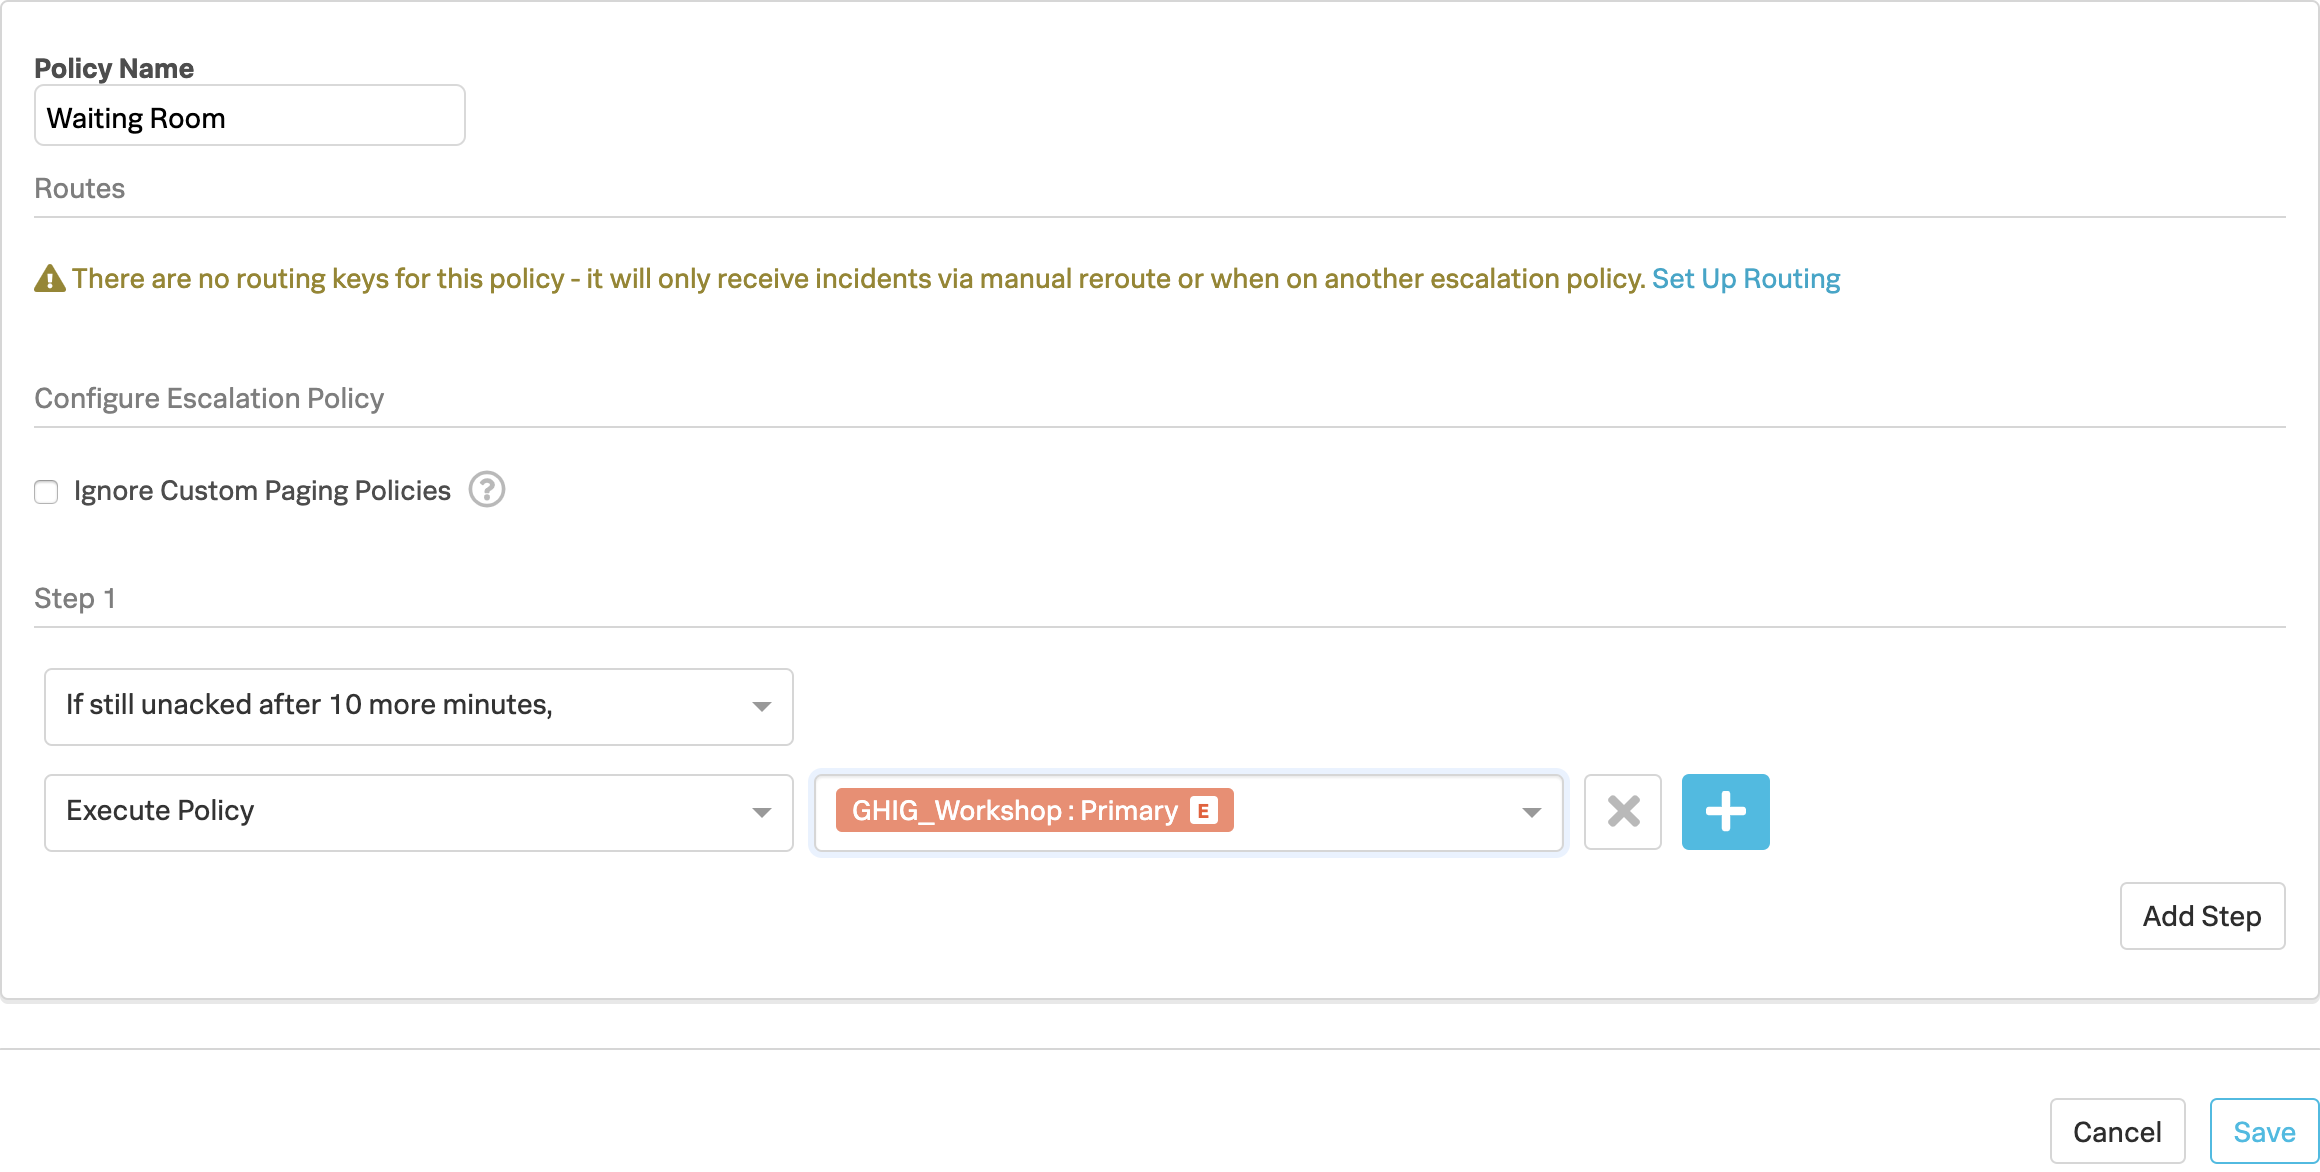
3. Waiting Room Policy
Click Add Escalation Policy
Policy Name: Waiting Room
Step 1
If still un-acknowledged after 10 more minutes
Execute Policy → [Your Team Name] : Primary
Click Save
You should now have the following three escalation polices:
You may have noticed that when we created each policy there was the following warning message:
Warning
There are no routing keys for this policy - it will only receive incidents via manual reroute or when on another escalation policy
This is because there are no Routing Keys linked to these Escalation Polices, so now that we have these polices configured we can create the Routing Keys and link them to our Polices..
Routing Keys map the incoming alert messages from your monitoring system to an Escalation Policy which in turn sends the notifications to the appropriate team.
Note that routing keys are case insensitive and should only be composed of letters, numbers, hyphens, and underscores.
The aim of this module is for you to create some routing keys and then link them to your Escalation Policies you have created in the previous exercise.
1. Instance ID
Each participant requires a unique Routing Key so we use the Hostname of the EC2 Instance you were allocated. We are only doing this to ensure your Routing Key is unique and we know all Hostnames are unique. In a production deployment the Routing Key would typically reflect the name of a System or Service being monitored, or a Team such as 1st Line Support etc.
Your welcome e-mail informed you of the details of your EC2 Instance that has been provided for you to use during this workshop and you should have logged into this as part of the 1st exercise.
The e-mail also contained the Hostname of the Instance, but you can also obtain it from the Instance directly. To get your Hostname from within the shell session connected to your Instance run the following command:
echo${HOSTNAME}
zevn
It is very important that when creating the Routing Keys you use the 4 letter hostname allocated to you as a Detector has been configured within Splunk Infrastructure Monitoring using this hostname, so any deviation will cause future exercises to fail.
2 Create Routing Keys
Navigate to Settings on the main menu bar, you should now be at the Routing Keys page.
You are going to create the following two Routing Keys using the naming conventions listed in the following table, but replacing {==HOSTNAME==} with the value from above and replace TEAM_NAME with the team you were allocated or created earlier.
Routing Key
Escalation Policies
HOSTNAME_PRI
TEAM_NAME : Primary
HOSTNAME_WR
TEAM_NAME : Waiting Room
There will probably already be a number of Routing Keys configured, but to add a new one simply scroll to the bottom of the page and then click Add Key
In the left hand box, enter the name for the key as per the table above. In the Routing Key column, select your Teams Primary policy from the drop down in the Escalation Polices column. You can start typing your Team Name to filter the results.
Note
If there are a large number of participants on the workshop, resulting in an unusually large number of Escalation Policies sometimes the search filter does not list all the Policies under your Team Name. If this happens instead of using the search feature, simply scroll down to your team name, all the policies will then be listed.
Repeat the above steps for both Keys, xxxx_PRI and xxxx_WR, mapping them to your Teams Primary and Waiting Room policies.
You should now have two Routing Keys configured, similar to the following:
Tip
You can assign a Routing Key to multiple Escalation Policies if required by simply selecting more from the list
If you now navigate back to Teams → [Your Team Name] → Escalation Policies and look at the settings for your Primary and Waiting Room polices you will see that these now have Routes assigned to them.
The 24/7 policy does not have a Route assigned as this will only be triggered via an Execute Policy escalation from the Primary policy.
Please wait for the instructor before proceeding to the Incident Lifecycle/Overview module.