Getting Data In (GDI) with OTel and UF

45 minutes  

During this technical workshop, you will learn how to:

  • Efficiently deploy complex environments
  • Capture metrics from these environments to Splunk Observability Cloud
  • Auto-instrument a Python application
  • Enable OS logging to Splunk Enterprise via Universal Forwarder

To simplify the workshop modules, a pre-configured AWS EC2 instance is provided.

By the end of this technical workshop, you will have an approach to demonstrating metrics collection for complex environments and services.

Last Modified Sep 19, 2024

Subsections of Getting Data In (GDI) with OTel and UF

Getting Started with O11y GDI - Real Time Enrichment Workshop

Please note to begin the following lab, you must have completed the prework:

  • Obtain a Splunk Observability Cloud access key
  • Understand cli commands

Follow these steps if using O11y Workshop EC2 instances

1. Verify yelp data files are present

ll /var/appdata/yelp*

2. Export the following variables

export ACCESS_TOKEN=<your-access-token>
export REALM=<your-o11y-cloud-realm>
export clusterName=<your-k8s-cluster>

3. Clone the following repo

cd /home/splunk 
git clone https://github.com/leungsteve/realtime_enrichment.git 
cd realtime_enrichment/workshop 
python3 -m venv rtapp-workshop 
source rtapp-workshop/bin/activate
Last Modified Sep 19, 2024

Deploy Complex Environments and Capture Metrics

Objective: Learn how to efficiently deploy complex infrastructure components such as Kafka and MongoDB to demonstrate metrics collection with Splunk O11y IM integrations

Duration: 15 Minutes

Scenario

A prospect uses Kafka and MongoDB in their environment. Since there are integrations for these services, you’d like to demonstrate this to the prospect. What is a quick and efficient way to set up a live environment with these services and have metrics collected?

1. Where can I find helm charts?

  • Google “myservice helm chart”
  • https://artifacthub.io/ (Note: Look for charts from trusted organizations, with high star count and frequent updates)

2. Review Apache Kafka packaged by Bitnami

We will deploy the helm chart with these options enabled:

  • replicaCount=3
  • metrics.jmx.enabled=true
  • metrics.kafka.enabled=true
  • deleteTopicEnable=true

3. Review MongoDB(R) packaged by Bitnami

We will deploy the helm chart with these options enabled:

  • version 12.1.31
  • metrics.enabled=true
  • global.namespaceOverride=default
  • auth.rootUser=root
  • auth.rootPassword=splunk
  • auth.enabled=false

4. Install Kafka and MongoDB with helm charts

helm repo add bitnami https://charts.bitnami.com/bitnami
helm install kafka --set replicaCount=3 --set metrics.jmx.enabled=true --set metrics.kafka.enabled=true  --set deleteTopicEnable=true bitnami/kafka
helm install mongodb --set metrics.enabled=true bitnami/mongodb --set global.namespaceOverride=default --set auth.rootUser=root --set auth.rootPassword=splunk --set auth.enabled=false --version 12.1.31

Verify the helm chart installation

helm list
NAME    NAMESPACE   REVISION    UPDATED                                 STATUS      CHART           APP VERSION
kafka   default     1           2022-11-14 11:21:36.328956822 -0800 PST deployed    kafka-19.1.3    3.3.1
mongodb default     1           2022-11-14 11:19:36.507690487 -0800 PST deployed    mongodb-12.1.31 5.0.10

Verify the helm chart installation

kubectl get pods
NAME                              READY   STATUS              RESTARTS   AGE
kafka-exporter-595778d7b4-99ztt   0/1     ContainerCreating   0          17s
mongodb-b7c968dbd-jxvsj           0/2     Pending             0          6s
kafka-1                           0/2     ContainerCreating   0          16s
kafka-2                           0/2     ContainerCreating   0          16s
kafka-zookeeper-0                 0/1     Pending             0          17s
kafka-0                           0/2     Pending             0          17s

Use information for each Helm chart and Splunk O11y Data Setup to generate values.yaml for capturing metrics from Kafka and MongoDB.

Note

values.yaml for the different services will be passed to the Splunk Helm Chart at installation time. These will configure the OTEL collector to capture metrics from these services.

4.1 Example kafka.values.yaml

otelAgent:
config:
    receivers:
    receiver_creator:
        receivers:
        smartagent/kafka:
            rule: type == "pod" && name matches "kafka"
            config:
                    #endpoint: '`endpoint`:5555'
            port: 5555
            type: collectd/kafka
            clusterName: sl-kafka
otelK8sClusterReceiver:
k8sEventsEnabled: true
config:
    receivers:
    kafkametrics:
        brokers: kafka:9092
        protocol_version: 2.0.0
        scrapers:
        - brokers
        - topics
        - consumers
    service:
    pipelines:
        metrics:
        receivers:
                #- prometheus
        - k8s_cluster
        - kafkametrics

4.2 Example mongodb.values.yaml

otelAgent:
    config:
        receivers:
        receiver_creator:
            receivers:
            smartagent/mongodb:
                rule: type == "pod" && name matches "mongo"
                config:
                type: collectd/mongodb
                host: mongodb.default.svc.cluster.local
                port: 27017
                databases: ["admin", "O11y", "local", "config"]
                sendCollectionMetrics: true
                sendCollectionTopMetrics: true

4.3 Example zookeeper.values.yaml

otelAgent:
    config:
        receivers:
        receiver_creator:
            receivers:
            smartagent/zookeeper:
                rule: type == "pod" && name matches "kafka-zookeeper"
                config:
                type: collectd/zookeeper
                host: kafka-zookeeper
                port: 2181

5. Install the Splunk OTEL helm chart

cd /home/splunk/realtime_enrichment/otel_yamls/ 

helm repo add splunk-otel-collector-chart https://signalfx.github.io/splunk-otel-collector-chart

helm repo update
helm install --set provider=' ' --set distro=' ' --set splunkObservability.accessToken=$ACCESS_TOKEN --set clusterName=$clusterName --set splunkObservability.realm=$REALM --set otelCollector.enabled='false' --set splunkObservability.logsEnabled='true' --set gateway.enabled='false' --values kafka.values.yaml --values mongodb.values.yaml --values zookeeper.values.yaml --values alwayson.values.yaml --values k3slogs.yaml --generate-name splunk-otel-collector-chart/splunk-otel-collector

6. Verify installation

Verify that the Kafka, MongoDB and Splunk OTEL Collector helm charts are installed, note that names may differ.

helm list
NAME                                NAMESPACE   REVISION    UPDATED                                 STATUS      CHART                           APP VERSION
kafka                               default     1           2021-12-07 12:48:47.066421971 -0800 PST deployed    kafka-14.4.1                    2.8.1
mongodb                             default     1           2021-12-07 12:49:06.132771625 -0800 PST deployed    mongodb-10.29.2                 4.4.10
splunk-otel-collector-1638910184    default     1           2021-12-07 12:49:45.694013749 -0800 PST deployed    splunk-otel-collector-0.37.1    0.37.1
kubectl get pods
NAME                                                              READY   STATUS    RESTARTS   AGE
kafka-zookeeper-0                                                 1/1     Running   0          18m
kafka-2                                                           2/2     Running   1          18m
mongodb-79cf87987f-gsms8                                          2/2     Running   0          18m
kafka-1                                                           2/2     Running   1          18m
kafka-exporter-7c65fcd646-dvmtv                                   1/1     Running   3          18m
kafka-0                                                           2/2     Running   1          18m
splunk-otel-collector-1638910184-agent-27s5c                      2/2     Running   0          17m
splunk-otel-collector-1638910184-k8s-cluster-receiver-8587qmh9l   1/1     Running   0          17m

7. Verify dashboards

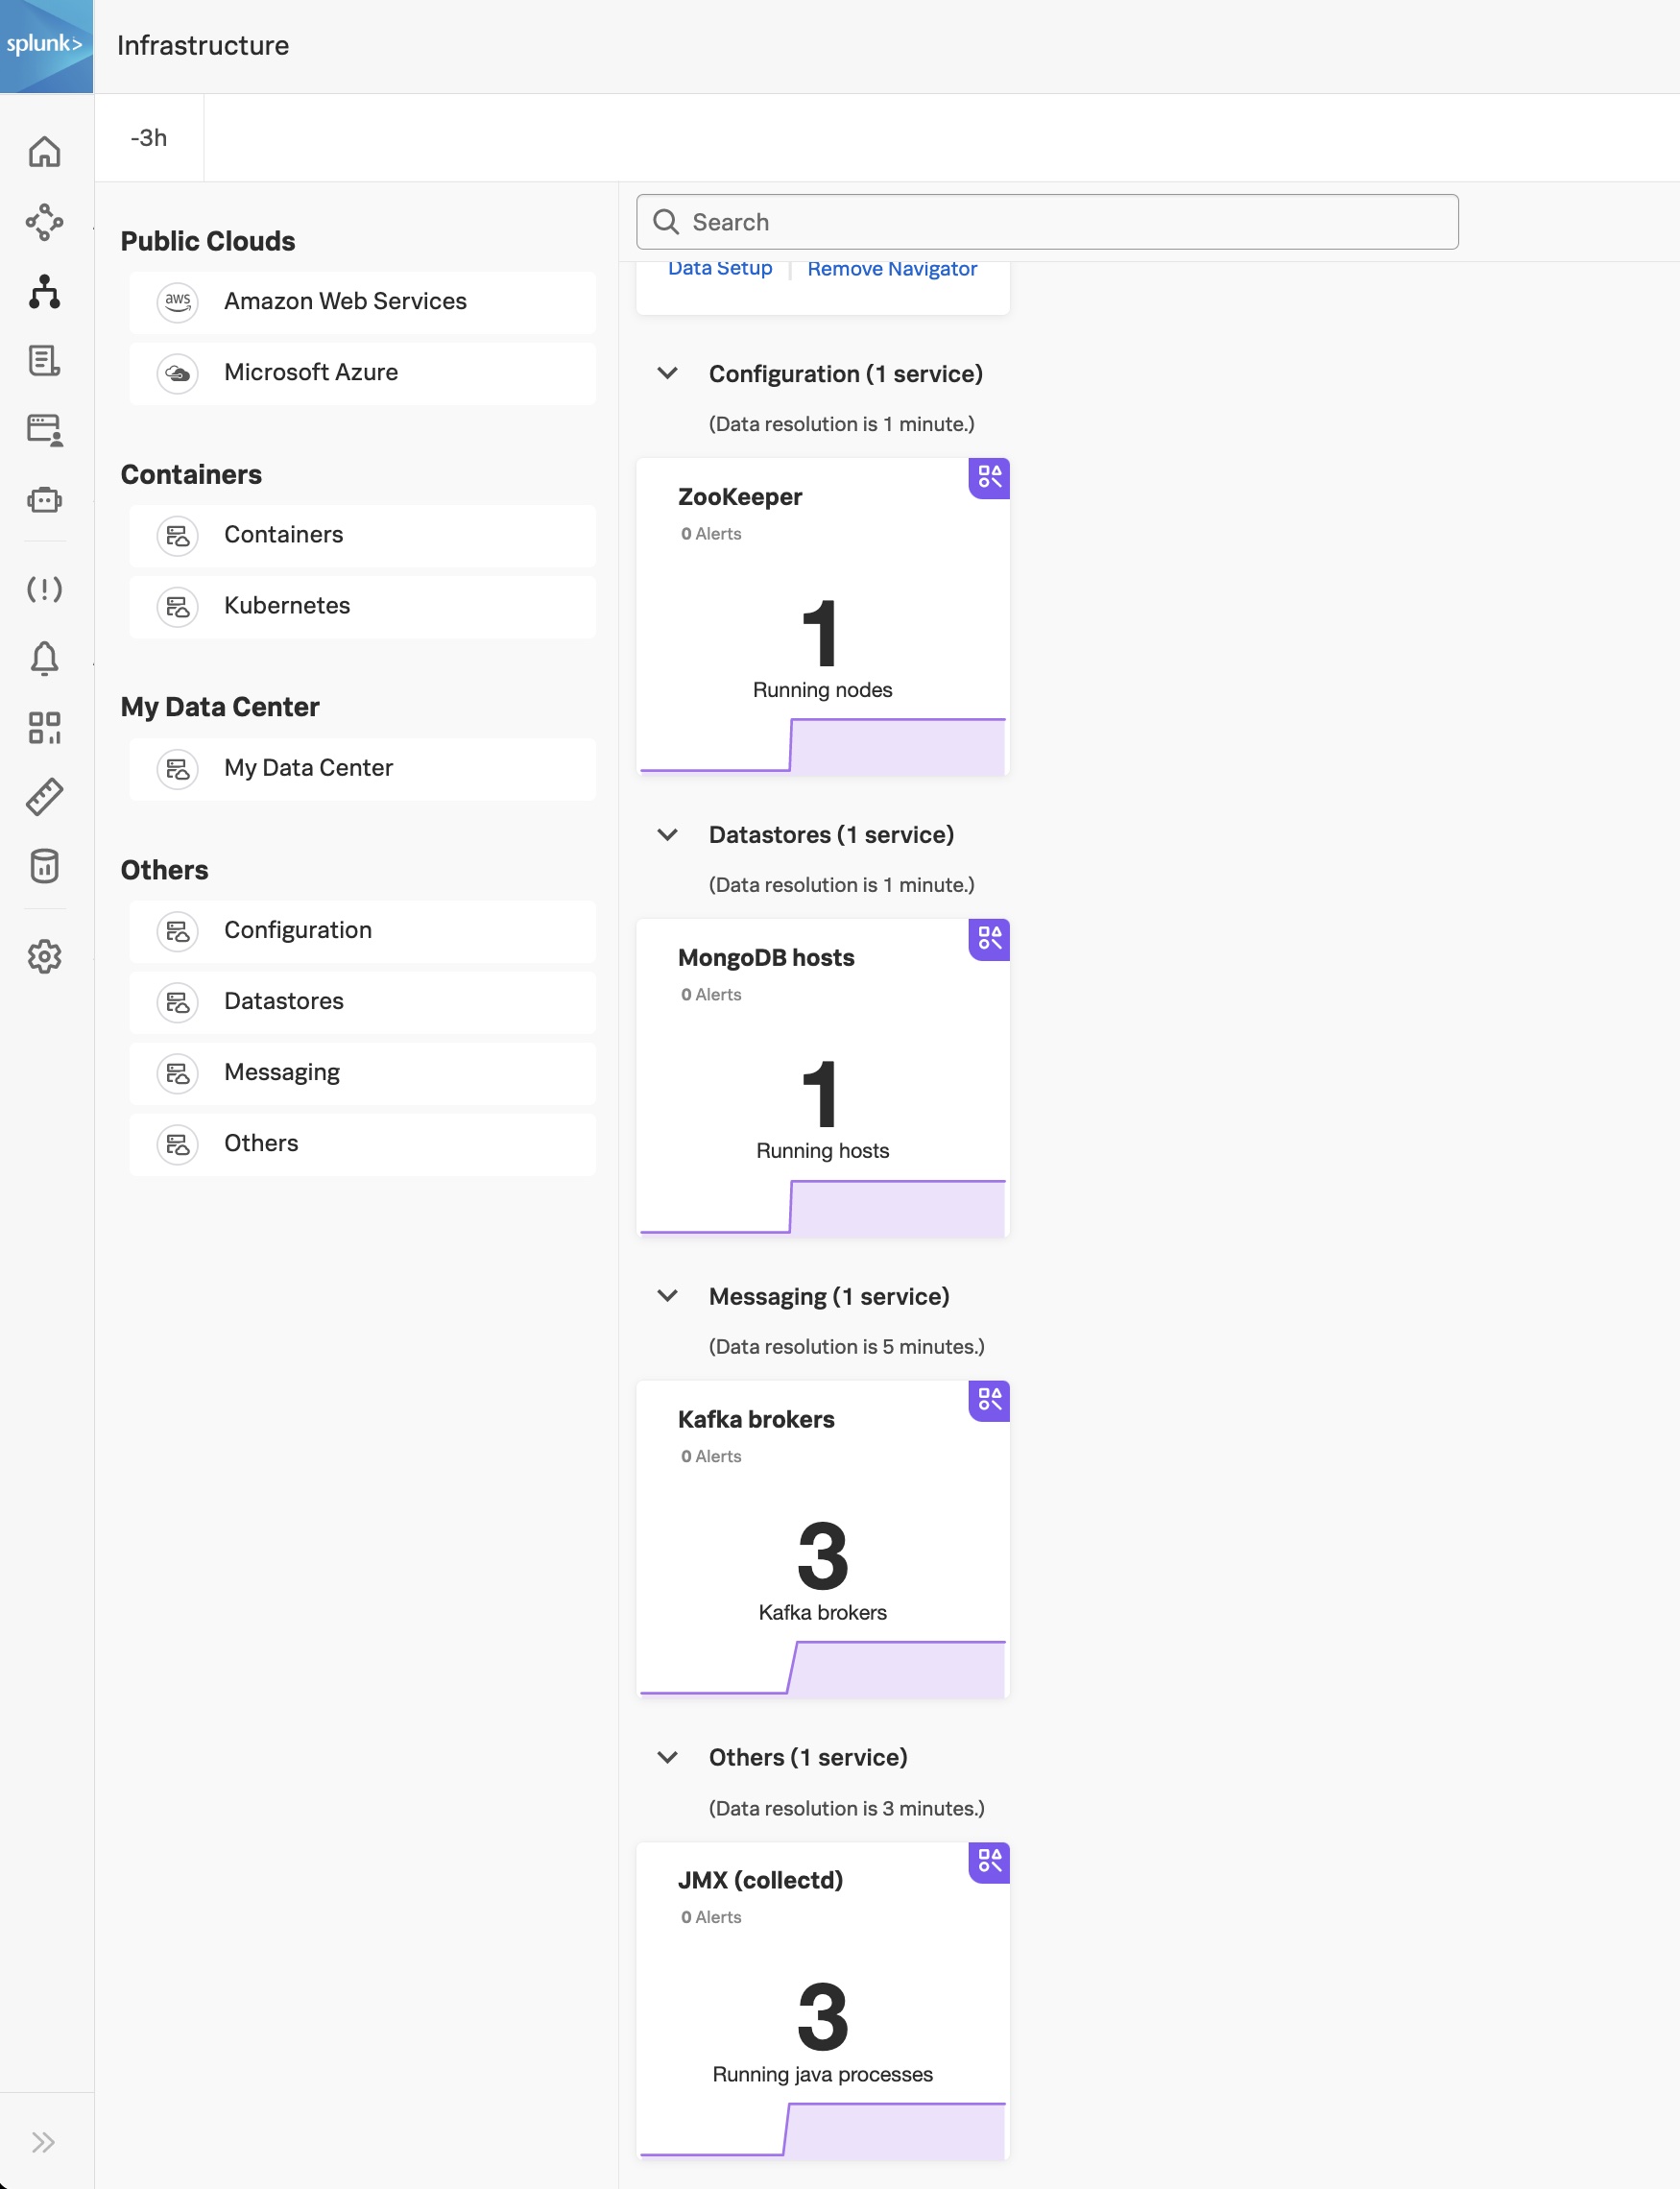
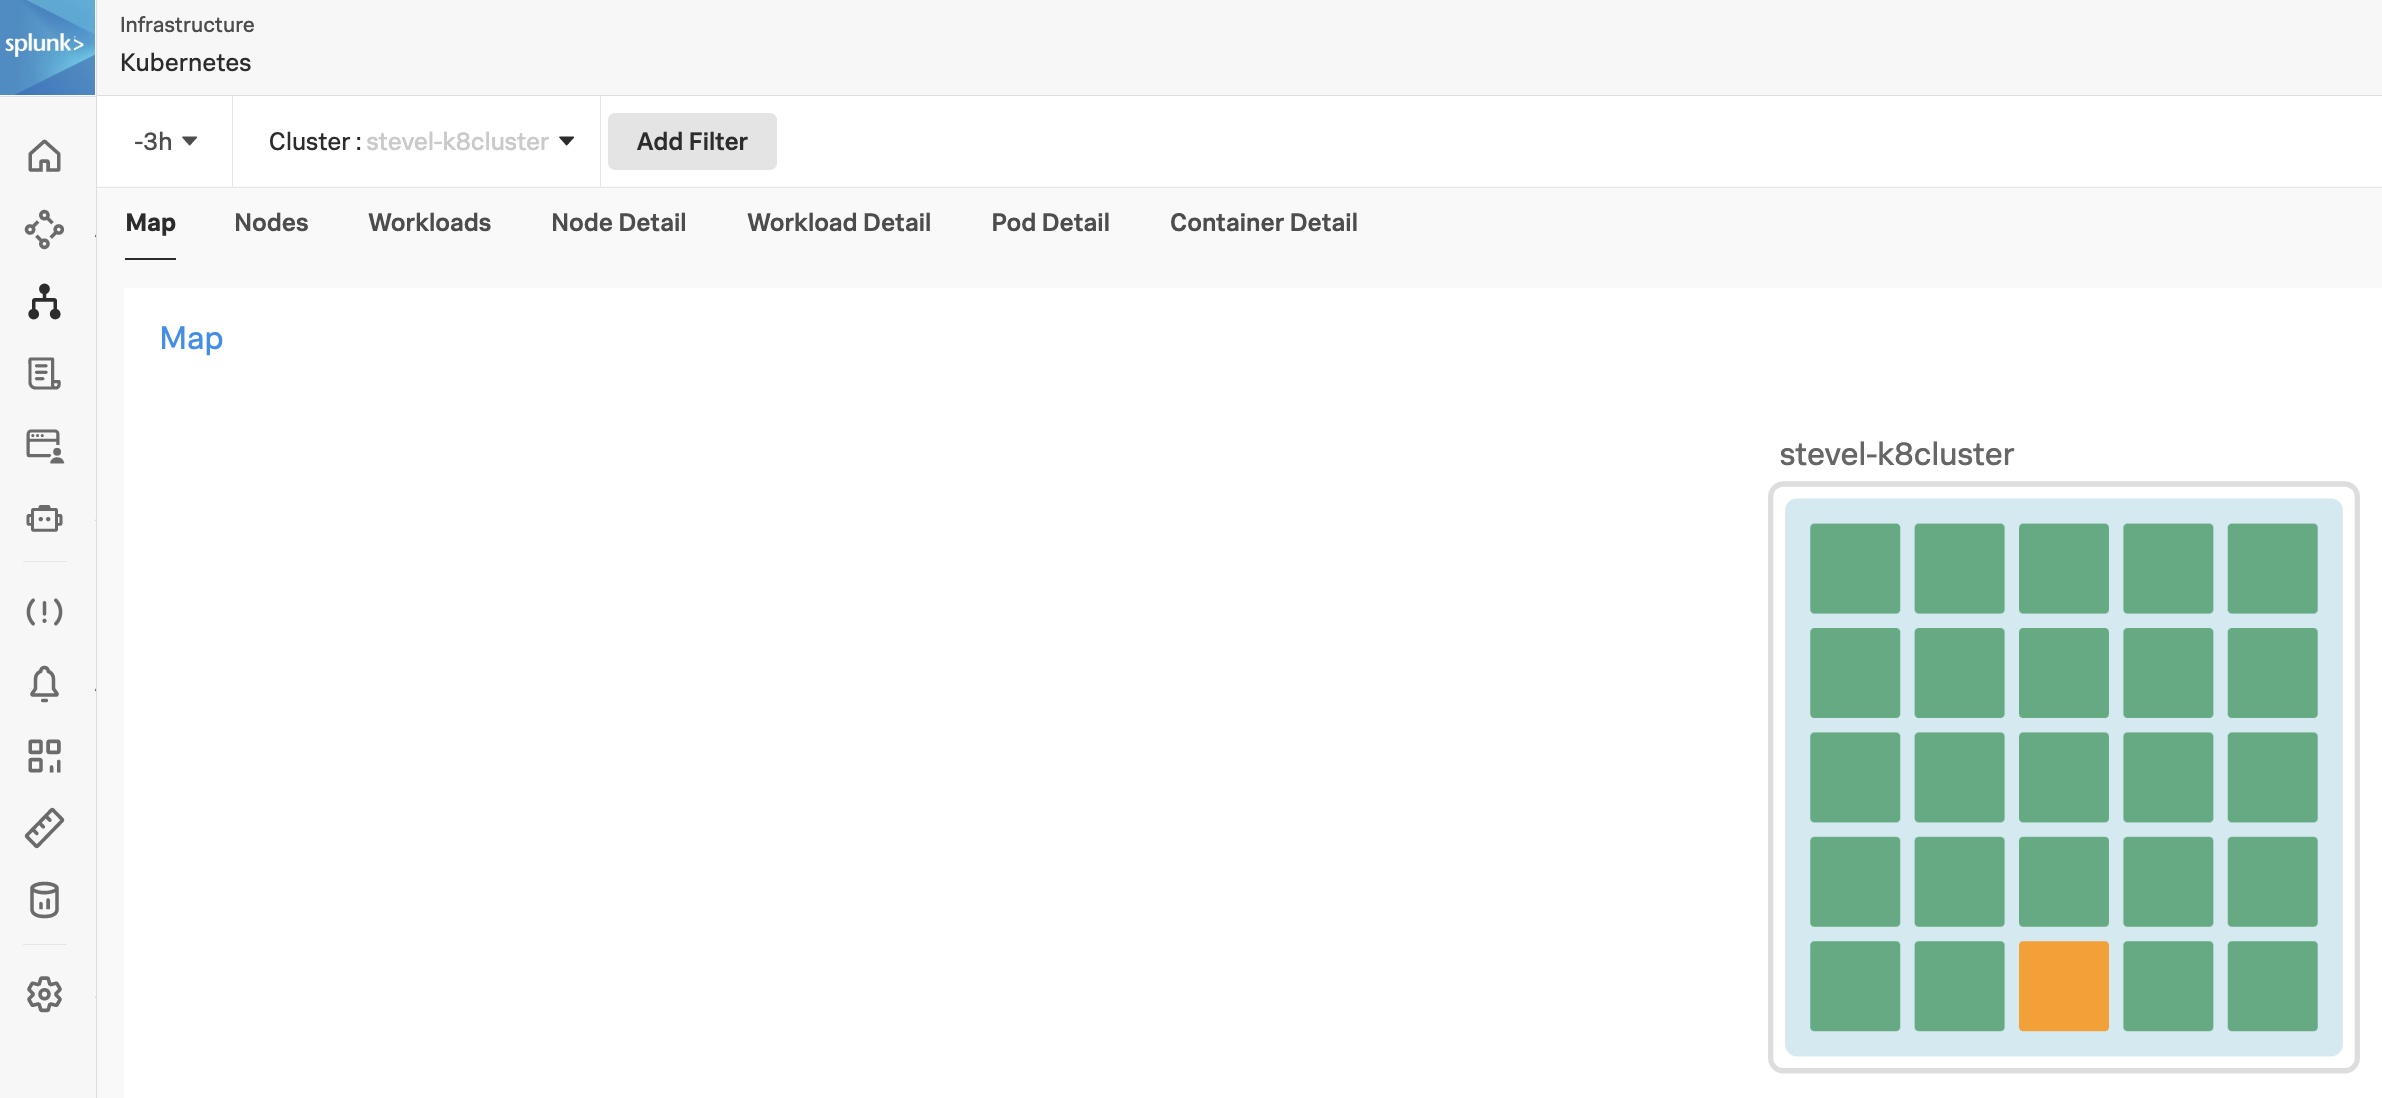
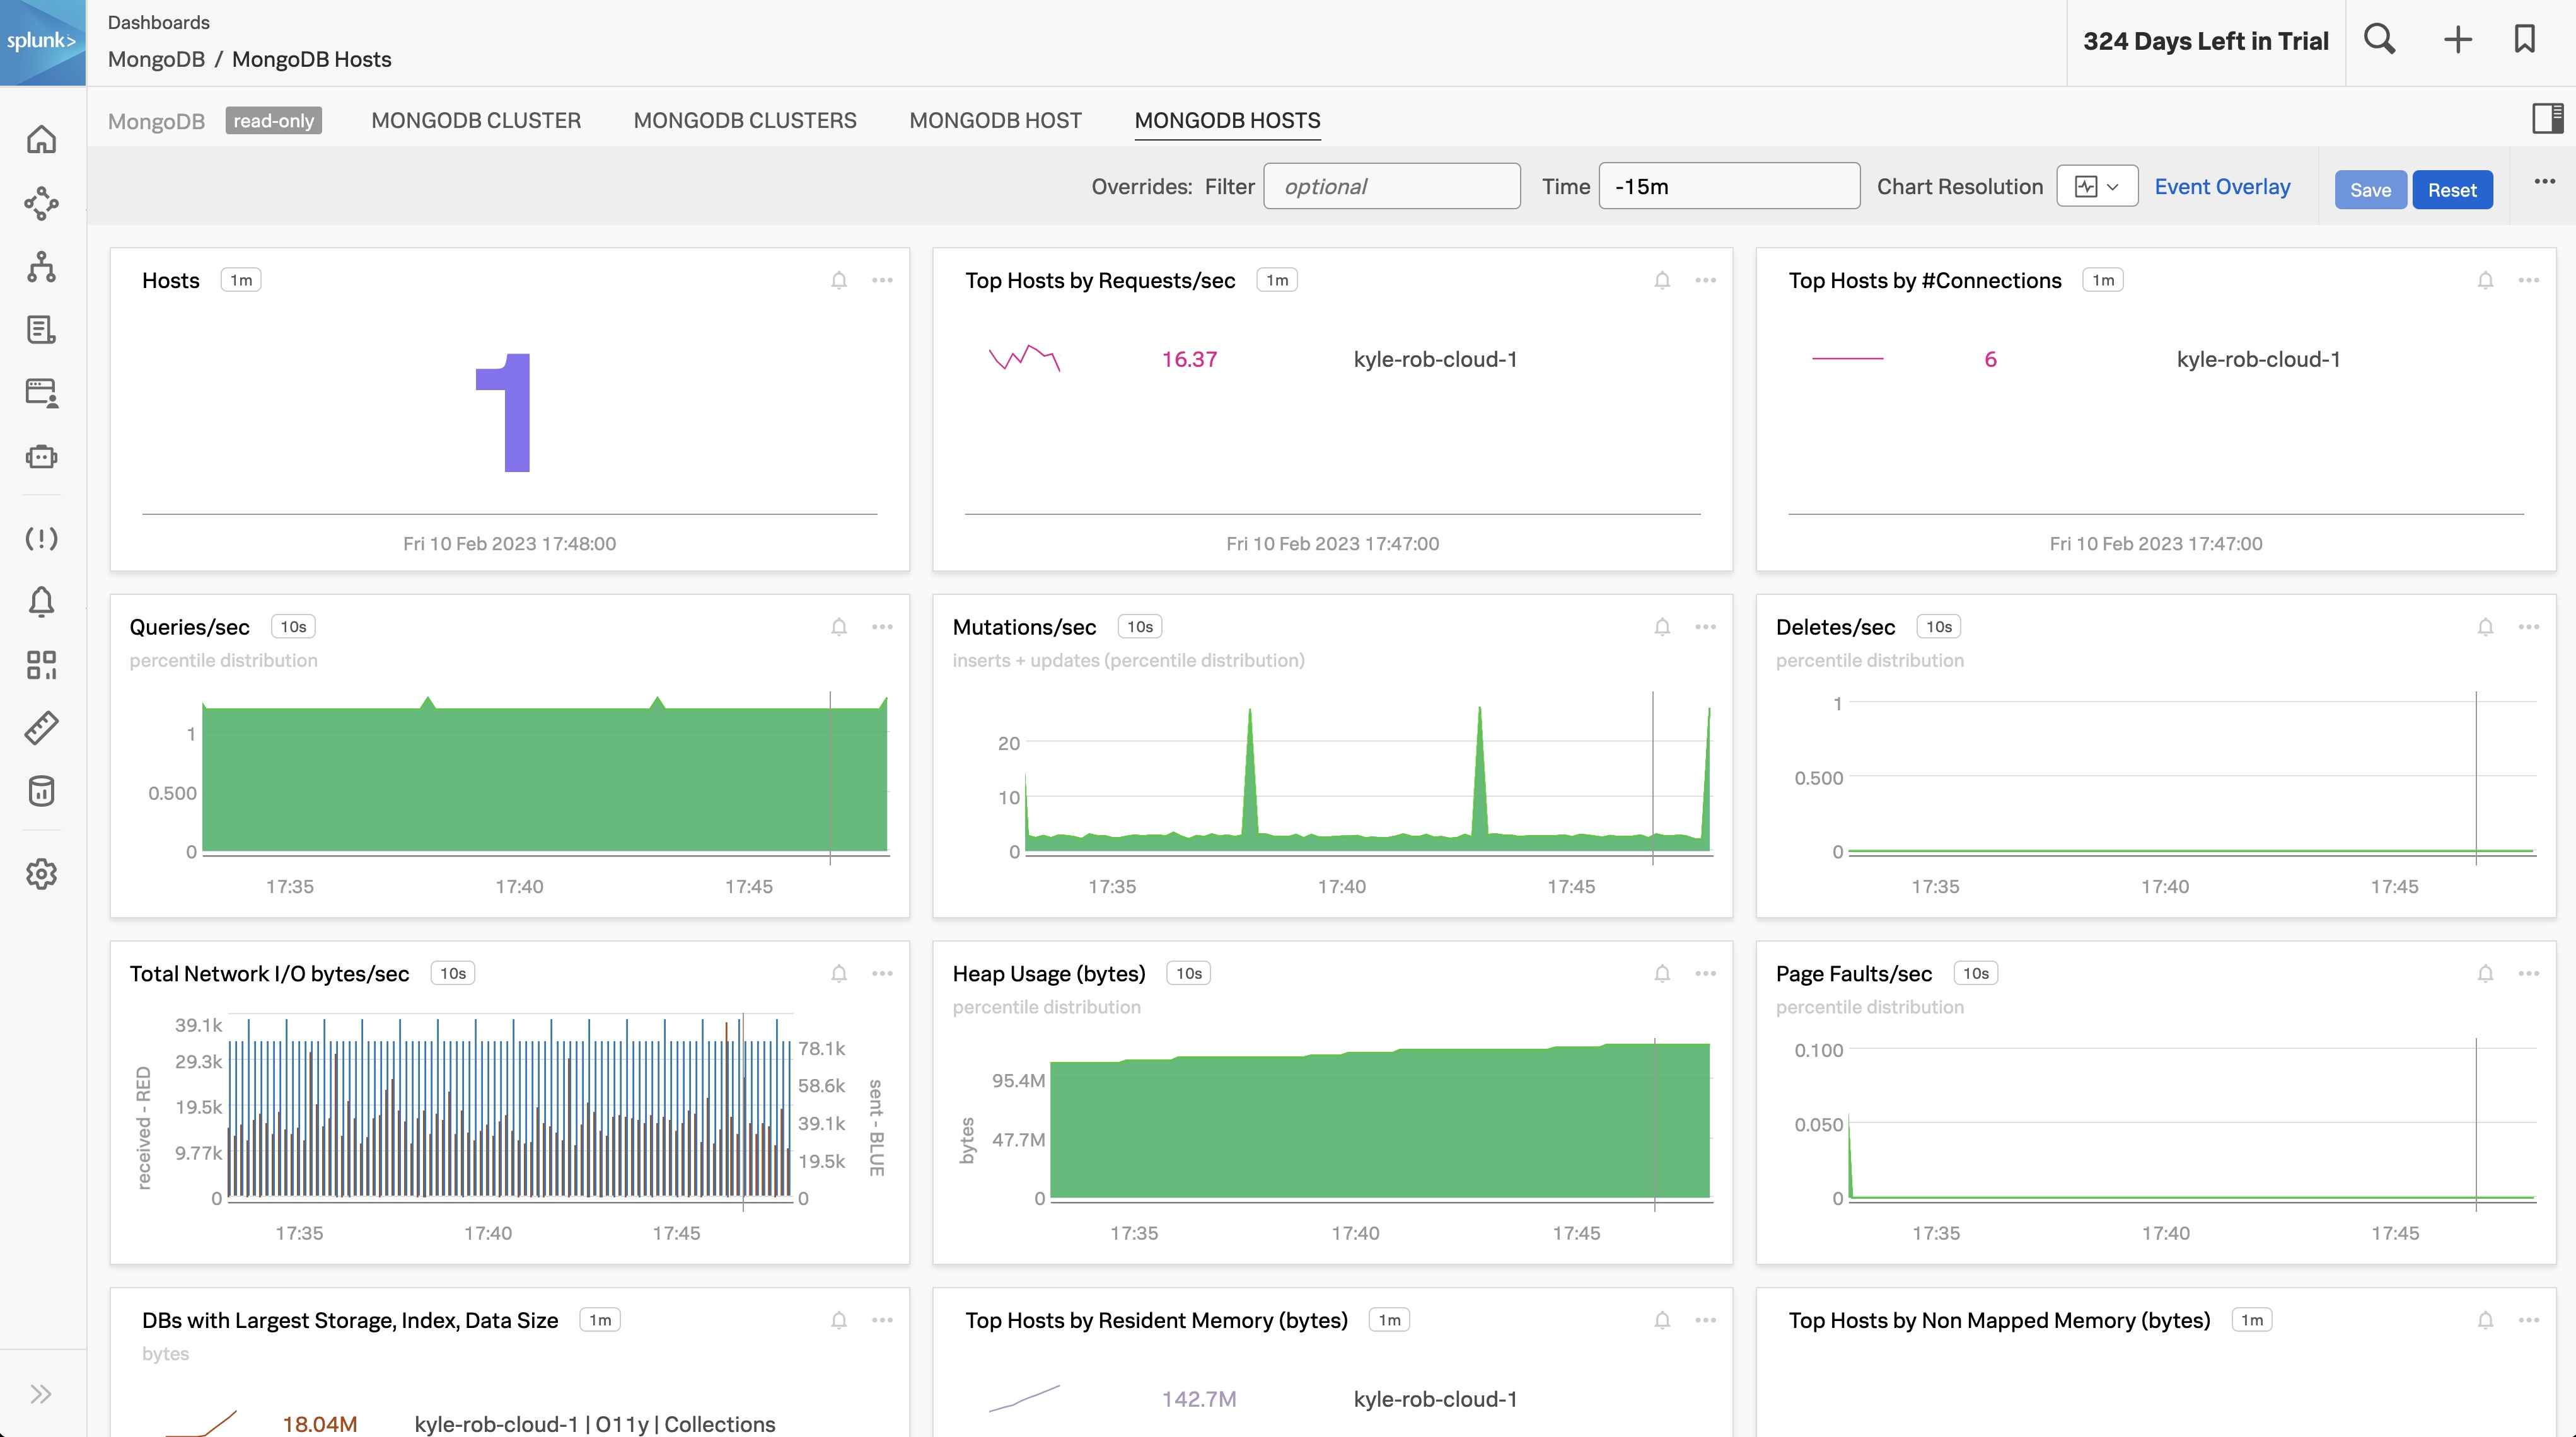
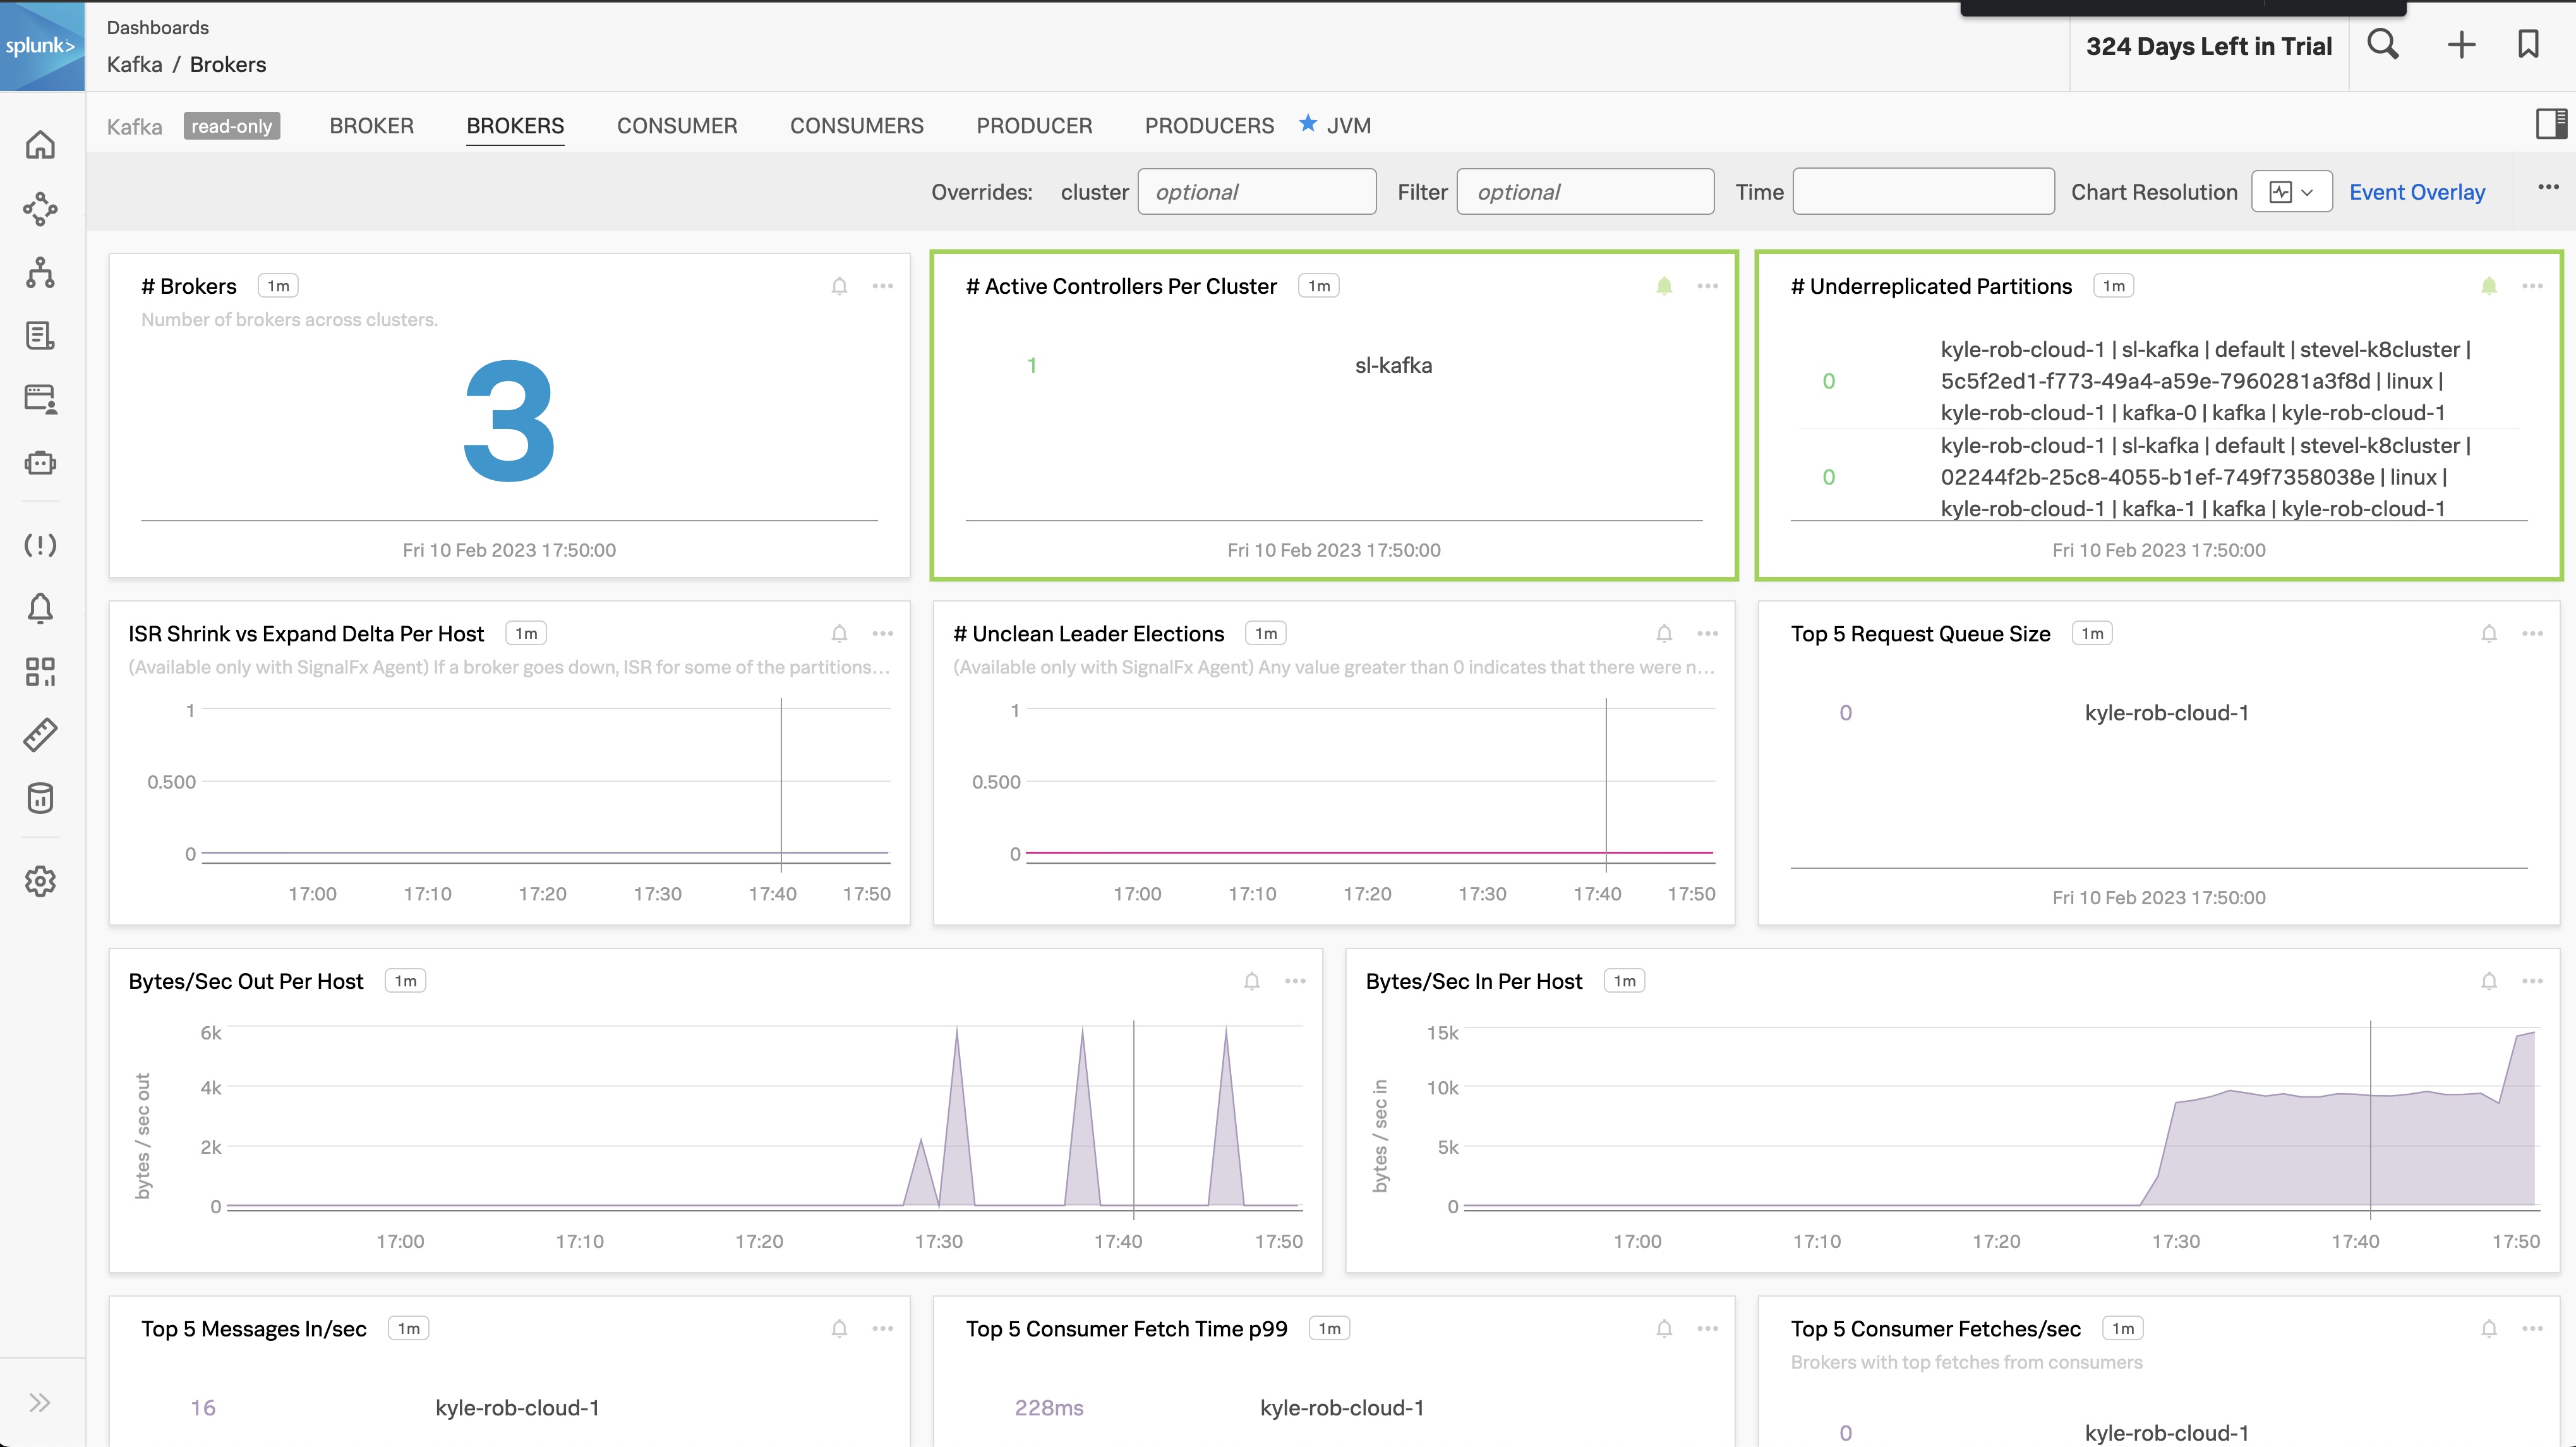
Verify that out of the box dashboards for Kafka, MongoDB and Zookeeper are populated in the Infrastructure Monitor landing page. Drill down into each component to view granular details for each service.

Tip: You can use the filter k8s.cluster.name with your cluster name to find your instance.

  • Infrastructure Monitoring Landing page:

IM-landing-page IM-landing-page

  • K8 Navigator:

k8-navigator k8-navigator

  • MongoDB Dashboard:

mongodb-dash mongodb-dash

  • Kafka Dashboard:

kafka-dash kafka-dash

Last Modified Sep 19, 2024

Code to Kubernetes - Python

Code to Kubernetes - Python

Objective: Understand activities to instrument a python application and run it on Kubernetes.

  • Verify the code
  • Containerize the app
  • Deploy the container in Kubernetes

Note: these steps do not involve Splunk

Duration: 15 Minutes

1. Verify the code - Review service

Navigate to the review directory

cd /home/splunk/realtime_enrichment/flask_apps/review/

Inspect review.py (realtime_enrichment/flask_apps/review)

cat review.py
from flask import Flask, jsonify
import random
import subprocess

review = Flask(__name__)
num_reviews = 8635403
num_reviews = 100000
reviews_file = '/var/appdata/yelp_academic_dataset_review.json'

@review.route('/')
def hello_world():
    return jsonify(message='Hello, you want to hit /get_review. We have ' + str(num_reviews) + ' reviews!')

@review.route('/get_review')
def get_review():
    random_review_int = str(random.randint(1,num_reviews))
    line_num = random_review_int + 'q;d'
    command = ["sed", line_num, reviews_file] # sed "7997242q;d" <file>
    random_review = subprocess.run(command, stdout=subprocess.PIPE, text=True)
    return random_review.stdout

if __name__ == "__main__":
    review.run(host ='0.0.0.0', port = 5000, debug = True)

Inspect requirements.txt

Flask==2.0.2

Create a virtual environment and Install the necessary python packages

cd /home/splunk/realtime_enrichment/workshop/flask_apps_start/review/

pip freeze #note output
pip install -r requirements.txt
pip freeze #note output

Start the REVIEW service. Note: You can stop the app with control+C

python3 review.py

 * Serving Flask app 'review' (lazy loading)
 * Environment: production
         ...snip...
 * Running on http://10.160.145.246:5000/ (Press CTRL+C to quit)
 * Restarting with stat
127.0.0.1 - - [17/May/2022 22:46:38] "GET / HTTP/1.1" 200 -
127.0.0.1 - - [17/May/2022 22:47:02] "GET /get_review HTTP/1.1" 200 -
127.0.0.1 - - [17/May/2022 22:47:58] "GET /get_review HTTP/1.1" 200 -

Verify that the service is working

  • Open a new terminal and ssh into your ec2 instance. Then use the curl command in your terminal.
curl http://localhost:5000
  • Or hit the URL http://{Your_EC2_IP_address}:5000 and http://{Your_EC2_IP_address}:5000/get_review with a browser
curl localhost:5000
{
  "message": "Hello, you want to hit /get_review. We have 100000 reviews!"
}

curl localhost:5000/get_review
{"review_id":"NjbiESXotcEdsyTc4EM3fg","user_id":"PR9LAM19rCM_HQiEm5OP5w","business_id":"UAtX7xmIfdd1W2Pebf6NWg","stars":3.0,"useful":0,"funny":0,"cool":0,"text":"-If you're into cheap beer (pitcher of bud-light for $7) decent wings and a good time, this is the place for you. Its generally very packed after work hours and weekends. Don't expect cocktails. \n\n-You run into a lot of sketchy characters here sometimes but for the most part if you're chilling with friends its not that bad. \n\n-Friendly bouncer and bartenders.","date":"2016-04-12 20:23:24"}
Workshop Question
  • What does this application do?
  • Do you see the yelp dataset being used?
  • Why did the output of pip freeze differ each time you ran it?
  • Which port is the REVIEW app listening on? Can other python apps use this same port?

2. Create a REVIEW container

To create a container image, you need to create a Dockerfile, run docker build to build the image referencing the Docker file and push it up to a remote repository so it can be pulled by other sources.

  • Create a Dockerfile
  • Creating a Dockerfile typically requires you to consider the following:
    • Identify an appropriate container image
      • ubuntu vs. python vs. alpine/slim
      • ubuntu - overkill, large image size, wasted resources when running in K8
      • this is a python app, so pick an image that is optimized for it
      • avoid alpine for python
    • Order matters
      • you’re building layers.
      • re-use the layers as much as possible
      • have items that change often towards the end
    • Other Best practices for writing Dockerfiles

Dockerfile for review

FROM python:3.10-slim
WORKDIR /app
COPY requirements.txt /app
RUN pip install -r requirements.txt
COPY ./review.py /app
EXPOSE 5000
CMD [ "python", "review.py" ]

Create a container image (locally) Run ‘docker build’ to build a local container image referencing the Dockerfile

docker build -f Dockerfile -t localhost:8000/review:0.01 .
[+] Building 35.5s (11/11) FINISHED
 => [internal] load build definition from Dockerfile                              0.0s
         ...snip...
 => [3/5] COPY requirements.txt /app                                              0.0s
 => [4/5] RUN pip install -r requirements.txt                                     4.6s
 => [5/5] COPY ./review.py /app                                                   0.0s
 => exporting to image                                                            0.2s
 => => exporting layers                                                           0.2s
 => => writing image sha256:61da27081372723363d0425e0ceb34bbad6e483e698c6fe439c5  0.0s
 => => naming to docker.io/localhost:8000/review:0.1                                   0.0

Push the container image into a container repository Run ‘docker push’ to place a copy of the REVIEW container to a remote location

docker push localhost:8000/review:0.01
The push refers to repository [docker.io/localhost:8000/review]
02c36dfb4867: Pushed
         ...snip...
fd95118eade9: Pushed
0.1: digest: sha256:3651f740abe5635af95d07acd6bcf814e4d025fcc1d9e4af9dee023a9b286f38 size: 2202

Verify that the image is in Docker Hub. The same info can be found in Docker Desktop

curl -s http://localhost:8000/v2/_catalog
{"repositories":["review"]}

3. Run REVIEW in Kubernetes

Create K8 deployment yaml file for the REVIEW app

Reference: Creating a Deployment

review.deployment.yaml

apiVersion: apps/v1
kind: Deployment
metadata:
  name: review
  labels:
    app: review
spec:
  replicas: 1
  selector:
    matchLabels:
      app: review
  template:
    metadata:
      labels:
        app: review
    spec:
      imagePullSecrets:
      - name: regcred
      containers:
      - image: localhost:8000/review:0.01
        name: review
        volumeMounts:
        - mountPath: /var/appdata
          name: appdata
      volumes:
      - name: appdata
        hostPath:
          path: /var/appdata

Notes regarding review.deployment.yaml:

  • labels - K8 uses labels and selectors to tag and identify resources
    • In the next step, we’ll create a service and associate it to this deployment using the label
  • replicas = 1
    • K8 allows you to scale your deployments horizontally
    • We’ll leverage this later to add load and increase our ingestion rate
  • regcred provides this deployment with the ability to access your dockerhub credentials which is necessary to pull the container image.
  • The volume definition and volumemount make the yelp dataset visible to the container

Create a K8 service yaml file for the review app.

Reference: Creating a service:

review.service.yaml

apiVersion: v1
kind: Service
metadata:
  name: review
spec:
  type: NodePort
  selector:
    app: review
  ports:
    - port: 5000
      targetPort: 5000
      nodePort: 30000

Notes about review.service.yaml:

  • the selector associates this service to pods with the label app with the value being review
  • the review service exposes the review pods as a network service
    • other pods can now ping ‘review’ and they will hit a review pod.
    • a pod would get a review if it ran curl http://review:5000
  • NodePort service
    • the service is accessible to the K8 host by the nodePort, 30000
    • Another machine that has this can get a review if it ran curl http://<k8 host ip>:30000

Apply the review deployment and service

kubectl apply -f review.service.yaml -f review.deployment.yaml

Verify that the deployment and services are running:

kubectl get deployments
NAME                                                    READY   UP-TO-DATE   AVAILABLE   AGE
review                                                  1/1     1            1           19h
kubectl get services
NAME                       TYPE        CLUSTER-IP      EXTERNAL-IP   PORT(S)                         AGE
review                     NodePort    10.43.175.21    <none>        5000:30000/TCP                  154d
curl localhost:30000
{
  "message": "Hello, you want to hit /get_review. We have 100000 reviews!"
}
curl localhost:30000/get_review
{"review_id":"Vv9rHtfBrFc-1M1DHRKN9Q","user_id":"EaNqIwKkM7p1bkraKotqrg","business_id":"TA1KUSCu8GkWP9w0rmElxw","stars":3.0,"useful":1,"funny":0,"cool":0,"text":"This is the first time I've actually written a review for Flip, but I've probably been here about 10 times.  \n\nThis used to be where I would take out of town guests who wanted a good, casual, and relatively inexpensive meal.  \n\nI hadn't been for a while, so after a long day in midtown, we decided to head to Flip.  \n\nWe had the fried pickles, onion rings, the gyro burger, their special burger, and split a nutella milkshake.  I have tasted all of the items we ordered previously (with the exception of the special) and have been blown away with how good they were.  My guy had the special which was definitely good, so no complaints there.  The onion rings and the fried pickles were greasier than expected.  Though I've thought they were delicious in the past, I probably wouldn't order either again.  The gyro burger was good, but I could have used a little more sauce.  It almost tasted like all of the ingredients didn't entirely fit together.  Something was definitely off. It was a friday night and they weren't insanely busy, so I'm not sure I would attribute it to the staff not being on their A game...\n\nDon't get me wrong.  Flip is still good.  The wait staff is still amazingly good looking.  They still make delicious milk shakes.  It's just not as amazing as it once was, which really is a little sad.","date":"2010-10-11 18:18:35"}
Workshop Question

What changes are required if you need to make an update to your Dockerfile now?

Last Modified Sep 19, 2024

Instrument REVIEWS for Tracing

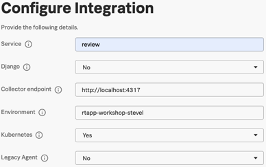
1. Use Data Setup to instrument a Python application

Within the O11y Cloud UI:

Data Management -> Add Integration -> Monitor Applications -> Python (traces) -> Add Integration

Provide the following to the Configure Integration Wizard:

  • Service: review

  • Django: no

  • collector endpoint: http://localhost:4317

  • Environment: rtapp-workshop-[YOURNAME]

  • Kubernetes: yes

  • Legacy Agent: no

o11y_cloud_ui o11y_cloud_ui

We are instructed to:

  • Install the instrumentation packages for your Python environment.
pip install splunk-opentelemetry[all]
  
splunk-py-trace-bootstrap
  • Configure the Downward API to expose environment variables to Kubernetes resources.

    For example, update a Deployment to inject environment variables by adding .spec.template.spec.containers.env like:

apiVersion: apps/v1
kind: Deployment
spec:
  selector:
    matchLabels:
      app: your-application
  template:
    spec:
      containers:
        - name: myapp
          env:
            - name: SPLUNK_OTEL_AGENT
              valueFrom:
                fieldRef:
                  fieldPath: status.hostIP
            - name: OTEL_EXPORTER_OTLP_ENDPOINT
              value: "http://$(SPLUNK_OTEL_AGENT):4317"
            - name: OTEL_SERVICE_NAME
              value: "review"
            - name: OTEL_RESOURCE_ATTRIBUTES
              value: "deployment.environment=rtapp-workshop-stevel"
  • Enable the Splunk OTel Python agent by editing your Python service command.

    splunk-py-trace python3 main.py --port=8000
  • The actions we must perform include:

    • Update the Dockerfile to install the splunk-opentelemetry packages
    • Update the deployment.yaml for each service to include these environment variables which will be used by the pod and container.
    • Update our Dockerfile for REVIEW so that our program is bootstrapped with splunk-py-trace
Note

We will accomplish this by:

  1. generating a new requirements.txt file
  2. generating a new container image with an updated Dockerfile for REVIEW and then
  3. update the review.deployment.yaml to capture all of these changes.

2. Update the REVIEW container

  • Generate a new container image

  • Update the Dockerfile for REVIEW (/workshop/flask_apps_finish/review)

    FROM python:3.10-slim
    
    WORKDIR /app
    COPY requirements.txt /app
    RUN pip install -r requirements.txt
    RUN pip install splunk-opentelemetry[all]
    RUN splk-py-trace-bootstrap
    
    COPY ./review.py /app
    
    EXPOSE 5000
    ENTRYPOINT [ "splunk-py-trace" ]
    CMD [ "python", "review.py" ]
Note

Note that the only lines, in bold, added to the Dockerfile

  • Generate a new container image with docker build in the ‘finished’ directory
  • Notice that I have changed the repository name from localhost:8000/review:0.01 to localhost:8000/review-splkotel:0.01

Ensure you are in the correct directory.

pwd
./workshop/flask_apps_finish/review
docker build -f Dockerfile.review -t localhost:8000/review-splkotel:0.01 .
[+] Building 27.1s (12/12) FINISHED
=> [internal] load build definition from Dockerfile                                                        0.0s
=> => transferring dockerfile: 364B                                                                        0.0s
=> [internal] load .dockerignore                                                                           0.0s
=> => transferring context: 2B                                                                             0.0s
=> [internal] load metadata for docker.io/library/python:3.10-slim                                         1.6s
=> [auth] library/python:pull token for registry-1.docker.io                                               0.0s
=> [1/6] FROM docker.io/library/python:3.10-slim@sha256:54956d6c929405ff651516d5ebbc204203a6415c9d2757aad  0.0s
=> [internal] load build context                                                                           0.3s
=> => transferring context: 1.91kB                                                                         0.3s
=> CACHED [2/6] WORKDIR /app                                                                               0.0s
=> [3/6] COPY requirements.txt /app                                                                        0.0s
=> [4/6] RUN pip install -r requirements.txt                                                              15.3s
=> [5/6] RUN splk-py-trace-bootstrap                                                                       9.0s
=> [6/6] COPY ./review.py /app                                                                             0.0s
=> exporting to image                                                                                      0.6s
=> => exporting layers                                                                                     0.6s
=> => writing image sha256:164977dd860a17743b8d68bcc50c691082bd3bfb352d1025dc3a54b15d5f4c4d                0.0s
=> => naming to docker.io/localhost:8000/review-splkotel:0.01                                              0.0s
  • Push the image to Docker Hub with docker push command
docker push localhost:8000/review-splkotel:0.01
The push refers to repository [docker.io/localhost:8000/review-splkotel]
682f0e550f2c: Pushed
dd7dfa312442: Pushed
917fd8334695: Pushed
e6782d51030d: Pushed
c6b19a64e528: Mounted from localhost:8000/review
8f52e3bfc0ab: Mounted from localhost:8000/review
f90b85785215: Mounted from localhost:8000/review
d5c0beb90ce6: Mounted from localhost:8000/review
3759be374189: Mounted from localhost:8000/review
fd95118eade9: Mounted from localhost:8000/review
0.01: digest: sha256:3b251059724dbb510ea81424fc25ed03554221e09e90ef965438da33af718a45 size: 2412

3. Update the REVIEW deployment in Kubernetes

  • review.deployment.yaml must be updated with the following changes:

    • Load the new container image on Docker Hub
    • Add environment variables so traces can be emitted to the OTEL collector
  • The deployment must be replaced using the updated review.deployment.yaml

    • Update review.deployment.yaml (updates highlighted in bold)

      apiVersion: apps/v1
      kind: Deployment
      metadata:
        name: review
        labels:
          app: review
      spec:
        replicas: 1
        selector:
          matchLabels:
            app: review
        template:
          metadata:
            labels:
              app: review
          spec:
            imagePullSecrets:
              - name: regcred
            containers:
            - image: localhost:8000/review-splkotel:0.01
              name: review
              volumeMounts:
              - mountPath: /var/appdata
                name: appdata
              env:
              - name: SPLUNK_OTEL_AGENT
                valueFrom:
                  fieldRef:
                    fieldPath: status.hostIP
              - name: OTEL_SERVICE_NAME
                value: 'review'
              - name: SPLUNK_METRICS_ENDPOINT
                value: "http://$(SPLUNK_OTEL_AGENT):9943"
              - name: OTEL_EXPORTER_OTLP_ENDPOINT
                value: "http://$(SPLUNK_OTEL_AGENT):4317"
              - name: OTEL_RESOURCE_ATTRIBUTES
                value: 'deployment.environment=rtapp-workshop-stevel'
            volumes:
            - name: appdata
              hostPath:
                path: /var/appdata
  • Apply review.deployment.yaml. Kubernetes will automatically pick up the changes to the deployment and redeploy new pods with these updates

    • Notice that the review-* pod has been restarted
kubectl apply -f review.deployment.yaml
kubectl get pods
NAME                                                              READY   STATUS        RESTARTS   AGE
kafka-client                                                      0/1     Unknown       0          155d
curl                                                              0/1     Unknown       0          155d
kafka-zookeeper-0                                                 1/1     Running       0          26h
kafka-2                                                           2/2     Running       0          26h
kafka-exporter-647bddcbfc-h9gp5                                   1/1     Running       2          26h
mongodb-6f6c78c76-kl4vv                                           2/2     Running       0          26h
kafka-1                                                           2/2     Running       1          26h
kafka-0                                                           2/2     Running       1          26h
splunk-otel-collector-1653114277-agent-n4dfn                      2/2     Running       0          26h
splunk-otel-collector-1653114277-k8s-cluster-receiver-5f48v296j   1/1     Running       0          26h
splunk-otel-collector-1653114277-agent-jqxhh                      2/2     Running       0          26h
review-6686859bd7-4pf5d                                           1/1     Running       0          11s
review-5dd8cfd77b-52jbd                                           0/1     Terminating   0          2d10h

kubectl get pods
NAME                                                              READY   STATUS    RESTARTS   AGE
kafka-client                                                      0/1     Unknown   0          155d
curl                                                              0/1     Unknown   0          155d
kafka-zookeeper-0                                                 1/1     Running   0          26h
kafka-2                                                           2/2     Running   0          26h
kafka-exporter-647bddcbfc-h9gp5                                   1/1     Running   2          26h
mongodb-6f6c78c76-kl4vv                                           2/2     Running   0          26h
kafka-1                                                           2/2     Running   1          26h
kafka-0                                                           2/2     Running   1          26h
splunk-otel-collector-1653114277-agent-n4dfn                      2/2     Running   0          26h
splunk-otel-collector-1653114277-k8s-cluster-receiver-5f48v296j   1/1     Running   0          26h
splunk-otel-collector-1653114277-agent-jqxhh                      2/2     Running   0          26h
review-6686859bd7-4pf5d                                           1/1     Running   0          15s
Last Modified Sep 19, 2024

Monitor System Logs with Splunk Universal Forwarder

Objective: Learn how to monitor Linux system logs with the Universal Forwarder sending logs to Splunk Enterprise

Duration: 10 Minutes

Scenario

You’ve been tasked with monitoring the OS logs of the host running your Kubernetes cluster. We are going to utilize a script that will autodeploy the Splunk Universal Forwarder. You will then configure the Universal Forwarder to send logs to the Splunk Enterprise instance assigned to you.

1. Ensure You’re in the Correct Directory

  • we will need to be in /home/splunk/session-2
cd /home/splunk/session-2

2. Review the Universal Forwarder Install Script

  • Let’s take a look at the script that will install the Universal Forwarder and Linux TA automatically for you.
    • This script is primarily used for remote instances.
    • Note we are not using a deployment server in this lab, however it is recommended in production we do that.
    • What user are we installing Splunk as?
#!/bin/sh  
# This EXAMPLE script shows how to deploy the Splunk universal forwarder
# to many remote hosts via ssh and common Unix commands.
# For "real" use, this script needs ERROR DETECTION AND LOGGING!!
# --Variables that you must set -----
# Set username using by splunkd to run.
  SPLUNK_RUN_USER="ubuntu"

# Populate this file with a list of hosts that this script should install to,
# with one host per line. This must be specified in the form that should
# be used for the ssh login, ie. username@host
#
# Example file contents:
# splunkuser@10.20.13.4
# splunkker@10.20.13.5
  HOSTS_FILE="myhost.txt"

# This should be a WGET command that was *carefully* copied from splunk.com!!
# Sign into splunk.com and go to the download page, then look for the wget
# link near the top of the page (once you have selected your platform)
# copy and paste your wget command between the ""
  WGET_CMD="wget -O splunkforwarder-9.0.3-dd0128b1f8cd-Linux-x86_64.tgz 'https://download.splunk.com/products/universalforwarder/releases/9.0.3/linux/splunkforwarder-9.0.3-dd0128b1f8cd-Linux-x86_64.tgz'"
# Set the install file name to the name of the file that wget downloads
# (the second argument to wget)
  INSTALL_FILE="splunkforwarder-9.0.3-dd0128b1f8cd-Linux-x86_64.tgz"

# After installation, the forwarder will become a deployment client of this
# host.  Specify the host and management (not web) port of the deployment server
# that will be managing these forwarder instances.
# Example 1.2.3.4:8089
#  DEPLOY_SERVER="x.x.x.x:8089"


# After installation, the forwarder can have additional TA's added to the 
# /app directory please provide the local where TA's will be. 
  TA_INSTALL_DIRECTORY="/home/splunk/session-2"

# Set the seed app folder name for deploymentclien.conf
#  DEPLOY_APP_FOLDER_NAME="seed_all_deploymentclient"
# Set the new Splunk admin password
  PASSWORD="buttercup"

REMOTE_SCRIPT_DEPLOY="
  cd /opt
  sudo $WGET_CMD
  sudo tar xvzf $INSTALL_FILE
  sudo rm $INSTALL_FILE
  #sudo useradd $SPLUNK_RUN_USER
  sudo find $TA_INSTALL_DIRECTORY -name '*.tgz' -exec tar xzvf {} --directory /opt/splunkforwarder/etc/apps \;
  sudo chown -R $SPLUNK_RUN_USER:$SPLUNK_RUN_USER /opt/splunkforwarder
  echo \"[user_info] 
  USERNAME = admin
  PASSWORD = $PASSWORD\" > /opt/splunkforwarder/etc/system/local/user-seed.conf   
  #sudo cp $TA_INSTALL_DIRECTORY/*.tgz /opt/splunkforwader/etc/apps/
  #sudo find /opt/splunkforwarder/etc/apps/ -name '*.tgz' -exec tar xzvf {} \;
  #sudo -u splunk /opt/splunkforwarder/bin/splunk start --accept-license --answer-yes --auto-ports --no-prompt
  /opt/splunkforwarder/bin/splunk start --accept-license --answer-yes --auto-ports --no-prompt
  #sudo /opt/splunkforwarder/bin/splunk enable boot-start -user $SPLUNK_RUN_USER
  /opt/splunkforwarder/bin/splunk enable boot-start -user $SPLUNK_RUN_USER
  #sudo cp $TA_INSTALL_DIRECTORY/*.tgz /opt/splunkforwarder/etc/apps/

  exit
 "

DIR="$( cd "$( dirname "${BASH_SOURCE[0]}" )" >/dev/null && pwd )"


#===============================================================================================
  echo "In 5 seconds, will run the following script on each remote host:"
  echo
  echo "===================="
  echo "$REMOTE_SCRIPT_DEPLOY"
  echo "===================="
  echo 
  sleep 5
  echo "Reading host logins from $HOSTS_FILE"
  echo
  echo "Starting."
  for DST in `cat "$DIR/$HOSTS_FILE"`; do
    if [ -z "$DST" ]; then
      continue;
    fi
    echo "---------------------------"
    echo "Installing to $DST"
    echo "Initial UF deployment"
    sudo ssh -t "$DST" "$REMOTE_SCRIPT_DEPLOY"
  done  
  echo "---------------------------"
  echo "Done"
  echo "Please use the following app folder name to override deploymentclient.conf options: $DEPLOY_APP_FOLDER_NAME"

3. Run the install script

We will run the install script now. You will see some Warnings at the end. This is totally normal. The script is built for use on remote machines, however for todays lab you will be using localhost.

./install.sh

You will be asked Are you sure you want to continue connecting (yes/no/[fingerprint])? Answer Yes.

Enter your ssh password when prompted.

4. Verify installation of the Universal Forwarader

  • We need to verify that the Splunk Universal Forwarder is installed and running.
    • You should see a couple PID’s return and a “Splunk is currently running.” message.
/opt/splunkforwarder/bin/splunk status

5. Configure the Universal Forwarder to Send Data to Splunk Enterprise

/opt/splunkforwarder/bin/splunk add forward-server <your_splunk_enterprise_ip>:9997

6. Verify the Data in Your Splunk Enterprise Environment

  • We are now going to take a look at the Splunk Enterprise environment to verify logs are coming in.

    • Logs will be coming into index=main
  • Open your web browser and navigate to: http://<your_splunk_enterprise_ip:8000

    • You will use the credentials admin:<your_ssh_password>
  • In the search bar, type in the following:

  • index=main host=<your_host_name>

  • You should see data from your host. Take note of the interesting fields and the different data sources flowing in.