Poller Configuration
Poller is a service which is responsible for querying SNMP devices using the SNMP GET and WALK functionalities. Poller executes two main types of tasks:
-
The Walk task executes SNMP walk. SNMP walk is an SNMP application that uses SNMP GETNEXT requests to collect SNMP data from the network and infrastructure of SNMP-enabled devices, such as switches and routers. It is a time-consuming task, which may overload the SNMP device when executed too often. It is used by the SC4SNMP to collect and push all OID values, which the provided ACL has access to.
-
The Get task is a lightweight task that queries a subset of OIDs defined by the customer. This task monitors OIDs, such as memory or CPU utilization.
Poller has an inventory, which defines what and how often SC4SNMP has to poll.
Poller configuration file
The poller configuration is kept in a values.yaml file in the poller section.
values.yaml is used during the installation process for configuring Kubernetes values.
See the following poller example configuration:
poller:
  usernameSecrets:
   - sc4snmp-hlab-sha-aes
   - sc4snmp-hlab-sha-des
  enableFullWalk: false
  inventory: |
    address,port,version,community,secret,security_engine,walk_interval,profiles,smart_profiles,max_oid_to_process,delete
    10.202.4.202,,2c,public,,,2000,,,,
Info
The header line (address,port,version,community,secret,security_engine,walk_interval,profiles,smart_profiles,max_oid_to_process,delete) is necessary for the correct execution of SC4SNMP. Do not remove it.
Info
Starting with version 1.15.0, the max_oid_to_process field has been introduced as an optional addition to the inventory header. This update is backward compatible, and existing inventory headers remain fully supported.
The poller behaviour is configured via environment variables in .env. The inventory is configured in a separate inventory.csv file - see Inventory configuration.
Disable automatic polling of base profiles
There are two profiles that are being polled by default, so that even without any configuration set up, you can see the data in Splunk. You can disable it with the following parameter:
poller:
  pollBaseProfiles: false
Set in .env:
POLL_BASE_PROFILES=false
Default walk scope
The default walk profile is polling only SNMPv2-MIB. If the full OID tree walk is required it can be enabled:
poller:
  enableFullWalk: true
Set in .env:
ENABLE_FULL_WALK=true
IPv6 hostname resolution
When IPv6 is enabled and device is dual stack, the hostname resolution will try to resolve the name to the IPv6 address first, then to the IPv4 address.
Define maxRepetitions
The maxRepetitions is a parameter used in SNMP GetBulk call. It is responsible for controlling the amount of variables in one request.
poller:
  maxRepetitions: 10
Set in .env:
MAX_REPETITIONS=10
maxRepetitions variable is the amount of requested next oids in response for each of varbinds in one request sent.
For example:
The configured variables:
poller:
  maxRepetitions: 2
MAX_REPETITIONS=2
The requested varbinds in one getBulk call:
IP-MIB.ipNetToMediaNetAddress
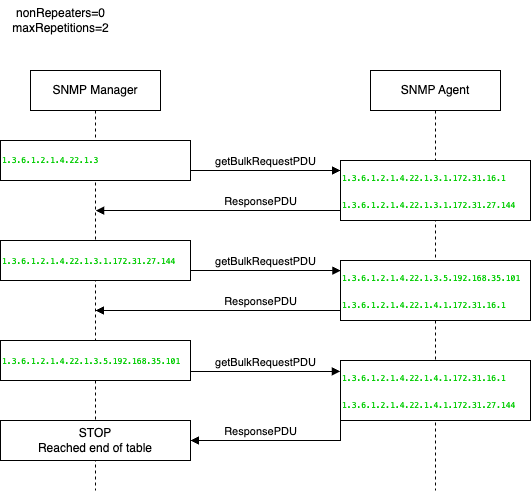
After third ResponsePDU the returned oids are out of scope for requested table, so the call is stopped.
It can be spotted on diagram that response for IP-MIB.ipNetToMediaNetAddress includes 2 oids as max repetition variable was set to 2.
Define usernameSecrets
Secrets are required to run SNMPv3 polling. To add v3 authentication details, create the secret: SNMPv3 Configuration, and put its name in usernameSecrets.
poller:
  usernameSecrets:
    - sc4snmp-hlab-sha-aes
In docker compose, SNMPv3 credentials are managed through secrets.json. Set the path to the folder containing it in .env:
SECRET_FOLDER_PATH=/absolute/path/to/secrets/folder
All secrets defined in secrets.json are automatically available to the poller. See SNMPv3 configuration for details on creating secrets.
Append OID index part to the metrics
Not every SNMP metric object is structured with its index as a one of the field values. We can append the index part of OID with:
poller:
  metricsIndexingEnabled: true
Set in .env:
METRICS_INDEXING_ENABLED=true
So the following change will make this metric object (derived from the OID 1.3.6.1.2.1.6.20.1.4.0.0.443)
{
   frequency: 5
   metric_name:sc4snmp.TCP-MIB.tcpListenerProcess: 309
   mibIndex: 0.0.443
   profiles: generic_switch
}
out of this object:
{
   frequency: 5
   metric_name:sc4snmp.TCP-MIB.tcpListenerProcess: 309
   profiles: generic_switch
}
Replace “-” with “_” in metrics name
There is a known issue with metric names that are not following the Splunk metric schema. Read more at addressing metric naming. To ensure seamless compatibility and avoid potential issues, SC4SNMP provides a configuration option to automatically convert hyphens in metric names to underscores.
You can enable this conversion by setting the splunkMetricNameHyphenToUnderscore parameter to true within the poller section of your SC4SNMP configuration:
poller:
  splunkMetricNameHyphenToUnderscore: true
Set in .env:
SPLUNK_METRIC_NAME_HYPHEN_TO_UNDERSCORE=true
Enabling this option transforms metric names from their hyphenated format to an underscore-separated format, aligning them with common Splunk metric naming conventions.
Before conversion (hyphens):
{
  "frequency": "60",
  "ifAdminStatus": "up",
  "ifAlias": "1",
  "ifDescr": "GigabitEthernet1",
  "ifIndex": "1",
  "ifName": "Gi1",
  "ifOperStatus": "up",
  "ifPhysAddress": "0a:aa:ef:53:67:15",
  "ifType": "ethernetCsmacd",
  "metric_name:sc4snmp.IF-MIB.ifInDiscards": 0,
  "metric_name:sc4snmp.IF-MIB.ifInErrors": 0,
  "metric_name:sc4snmp.IF-MIB.ifInOctets": 1481605109,
  "metric_name:sc4snmp.IF-MIB.ifOutDiscards": 0,
  "metric_name:sc4snmp.IF-MIB.ifOutErrors": 0,
  "metric_name:sc4snmp.IF-MIB.ifOutOctets": 3942570709,
  "profiles": "TEST"
}
After conversion (underscores):
{
  "frequency": "60",
  "ifAdminStatus": "up",
  "ifAlias": "1",
  "ifDescr": "GigabitEthernet1",
  "ifIndex": "1",
  "ifName": "Gi1",
  "ifOperStatus": "up",
  "ifPhysAddress": "0a:aa:ef:53:67:15",
  "ifType": "ethernetCsmacd",
  "metric_name:sc4snmp.IF_MIB.ifInDiscards": 0,
  "metric_name:sc4snmp.IF_MIB.ifInErrors": 0,
  "metric_name:sc4snmp.IF_MIB.ifInOctets": 1481605109,
  "metric_name:sc4snmp.IF_MIB.ifOutDiscards": 0,
  "metric_name:sc4snmp.IF_MIB.ifOutErrors": 0,
  "metric_name:sc4snmp.IF_MIB.ifOutOctets": 3942570709,
  "profiles": "TEST"
}
Configure inventory
See Inventory configuration for the full field reference and instructions on how to apply changes.